Grow Templates
Hydroponic plants have different and changing needs at each growth stage. A plan that matches those needs with the right light, nutrients and actionable reminders is vital for successful growing. In Elfsys Grow Cloud such a plan is called a Grow Template.
Your system is the hardware that enables hydroponic growing, and the grow template is the software that guides it. It is a way to capture and apply cultivation knowledge for consistent and improved results.
A grow template contains:
- basic properties including plant species, baseline system setup, growth cycle outline, etc.
- execution plan for each stage:
- stage attributes including estimated duration and expected outcome;
- device schedules;
- manual tasks to do during this stage.
A grow template is the starting point for a grow batch in the Elfsys App. As you grow your plants, you can record new insights and make changes to the plan, such as updating device schedules. After harvesting, you can backport these improvements into the original template, effectively making your growing experience repeatable.
Conception and terminology
Baseline system configuration
Since systems can be vastly different from one another, the automation controlling the cultivation process needs to adjust accordingly. For that to work, each grow template has a baseline system configuration that matches the layout of reference baseline system during the initial setup of a new grow template. It includes properties such as the setup of devices, reservoirs and container.
For example, assume a grow template with a baseline system that has three grow lights which are scheduled to run for six hours a day. If that template is used on a system with only two lights with the same output, Elfsys Grow Cloud will make the necessary adjustments and run the lights nine hours a day instead to provide sufficient light for the plant.
When you modify the system used as a baseline when creating a grow template, neither the template itself, nor its baseline system configuration, will change. As soon as the template is created, its baseline is decoupled from the original system. Therefore, when you modify a template, you are always making adjustments based on the conditions when you first created this template.
Grow stages
A plant's life cycle has several stages:
- Sprouting: The seed absorbs water and nutrients and begins to grow.
- Seedling: The plant grows leaves, stems and roots.
- Vegetative: The plant continues to develop but hasn't produced flowers yet.
- Flowering: The mature plant produces flowers that may be pollinated.
- Fruiting: The pollinated flowers produce fruits.
- Ripening: Fruits mature over time.
- Aging: Eventually, the plant dies, and its seeds may restart the cycle.
Grow templates are divided by stage to account for varying light, water and nutrient needs. Each stage has different device schedules, tasks and notifications. Not all plants have all stages; for example, lettuce and similar leafy greens only need the first three. When creating a template, you should only include the needed stages.
Estimated duration
Each stage has an estimated duration to help Elfsys Grow Cloud plan tasks and notifications. Tasks can be added to check if the stage's expected outcome has been achieved before the expected stage end.
For example, lettuce takes about 1 week from seed to seedling. Add a task that asking you to check for true leaves at 1 day ahead of the expected stage end and you will receive such notification on day 6 allowing transitioning to the seedling stage.
Device schedules
Different device schedules can be set for each stage of a grow template to meet the plant's needs during that stage. Schedules usually consist of the following types:
- Always on: The device will remain on during this stage, suitable for water pumps;
- Time of day: The device will be turned on at a set time and turned off at another set time during this stage, suitable for grow lights;
- Interval: The device will be turned on at fixed frequency intervals during this stage, suitable for air pumps and other equipments;
- None: The device will be idle during this stage, Elfsys Grow Cloud will not control this device at all.
More information about schedule options is available in the related devices documentation.
As described above, when a template is used for a different system than its baseline, these schedules will be adjusted according to attributes and configurations of devices in the new system.
Tasks
Plants need occasional care such as pruning. These tasks can be added to a grow template and will be sent as notifications when conditions are met as a reminder for you to execute the task.
Plant training
Plant training tasks improve plant appearance and yield through pruning, staking and trellising, and can also make them more resistant to pests and diseases.
Trimming
Trimming tasks remove excessive or damaged plant parts to improve overall health and promote new growth.
Refill
Manual or automatic refilling tasks can be set up to manage water and nutrient content. Elfsys Grow Cloud can trigger automatic refill notification based on sensor data, but in the meantime, you can still set a manual refill plan to more accurately manage changes in nutrient solutions.
Flush & refill
Flush & refill task can replace deposited salt and contaminants with fresh nutrient solutions and balance pH and nutrient levels. You are advised to execute flushing periodically.
Take picture
Picture task reminds you to record plant growth at the right time.
The Elfsys App does not currently have a camera function. Use your phone's stock camera app to record plant growth. A future update will add the ability to take and manage photos directly in the app.
Push notifications
Besides the five task categories mentioned earlier, you can add push notifications for other reminders. These can include observations, tips or even crop-specific recipes. You'll receive a notification at the pre-set time.
Official grow templates
We offer official first-party out of the box grow templates for products like our Elfsys Grow Kit. These templates are based on our experience and testing records and are automatically added to your account when you activate the kit. In the Elfsys App, they are marked as official and updated based on user feedback. You can also modify them based on your growing experience.
Only official templates without modifications will receive updates, as our updates would overwrite any changes made.
Manage grow templates
View grow templates
To view your custom grow templates, access the
settings via the home page, then navigate to Manage Inventory and Grow Templates.Tap
on the right side of the grow template, and select Edit to view its content.Create new template
Start a new template
- Access the settings via the home page, then navigate to Manage Systems and tap the system you'd like to use as the baseline system for the grow template.
- Tap Start Growing and then Create Template.
- Enter a name for your template in Template Name.
- Select the plant variety for the template in Plant, Variety (Cultivar). The current variety list only includes several common types of leafy and fruit vegetables. If your variety is not available, choose a similar variety that is closest to the target variety. For example, choose Lettuce when planting Crisphead. Choose Generic if there are no close varieties available, or for mixed planting. Click Request New Cultivar or contact us to add new varieties.
- Under Define Stages, use to add stages the plant will go through. In the pop-up selection box, select the stage that the plant will go through, you will be able to set device schedules and tasks for each stage later. Skip inapplicable stages (e.g. Flowering for leafy greens). You can use the minus button to remove individual stages again.
The earliest stage in the grow template is marked as Starting Stage. When planting begins, the batch defaults to this stage.
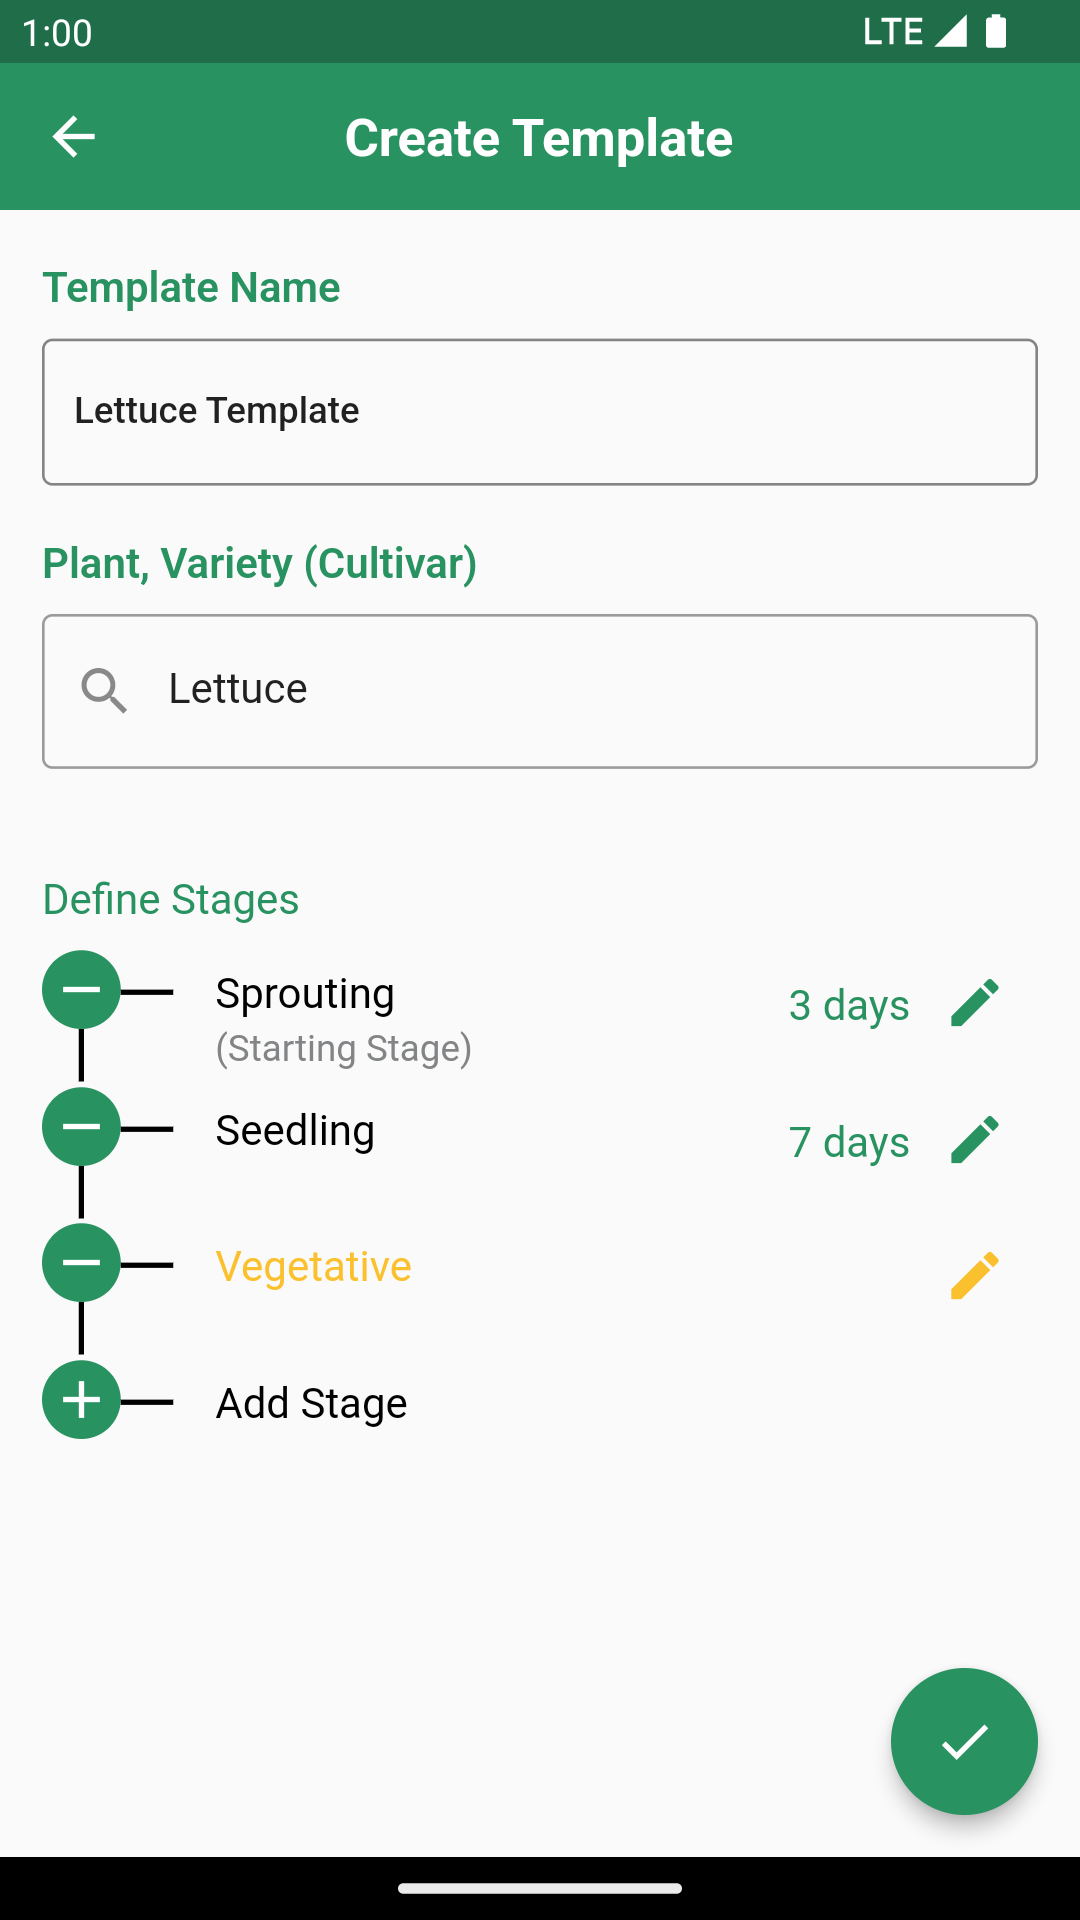
Example screenshot of the grow template definition page
The lettuce grow template has 3 stages: sprouting, seedling, and vegetative. The sprouting and seedling stages are fully set up whereas the yellow font color of the vegetative stage indicates that it is not configured yet.
Configure stages
Stage definition and automation
For each stage, define a projected duration, expected outcome, and appropriate device schedules.
- Tap the edit button on the right side of the stage to configure.
- In the input box at the right of Estimated Duration, enter the estimated duration for this stage in days.
- Define the expected outcome of this stage in the input box of Expected Outcome, which refers to the features or characteristics that the plant should have developed or what can be observed at the end of that stage. For example, for leafy greens, the expected outcome of the sprouting stage could be the development of the first true leaves. This information is used by the Elfsys App to ask for confirmation at the projected end of the stage and to transition to the next grow stage upon positive confirmation.
- Set up schedules for operating your devices during this stage in Device Schedules.
Create tasks
You can also add tasks to the grow template that the Elfsys App will remind you to complete based on certain triggers. Click Tasks at the top of the page to start.
- Tap the add button.
- Choose a trigger for task execution. Currently, only the Schedule option is available, which triggers the task on a specified day of the stage. See the table below for examples.
| Day Of Stage | Estimated Duration | Behavior |
|---|---|---|
| 0 | 3 | Immediately after transitioning to this stage |
| 3 | 3 | Three days after transitioning to this stage |
| 4 | 3 | Warning will be given as notification time is beyond estimated stage end |
- Choose an appropriate Action type for the task and complete all relevant inputs. Any information entered in the Note field will also appear in the notification.
- Tap the confirm icon to create the task.
Repeat the above steps to add more stage tasks to the grow template.
Finalize stage setup
After configuring the stage and creating all relevant tasks, tap Finish on the Stage Definition tab to confirm your stage setup.
Save grow template
After configuring all stages, tap the
confirm icon in the lower right corner to save the grow template.You can now use it to start a new grow batch and adjust it in the subsequent planting process.
Edit grow templates
- Access the settings via the home page, then navigate to Manage Inventory and Grow Templates.
- Tap the three dots on the right side of a template and select Edit.
- Make your changes and tap the confirm icon to save.
Template updates only apply to future grow batches. Schedules and tasks for in-progress batches remain unchanged.
The original template is preserved after updates. Future version of the Elfsys App will allow you to view past changes to your grow templates and analyze your cultivation productivity.
Delete grow templates
Deleting a grow template is irreversible. Proceed with caution.
- Access the settings via the home page, then navigate to Manage Inventory and Grow Template.
- Tap the three dots on the right side of a template and select Delete.
- Confirm the operation in the prompt.
All grow batches based on this template will continue to function normally and will not be affected with the deletion.
Frequently asked questions
Can I create a new grow template without a system?
Grow templates contain instructions that are always relative to the topology of a specific system, so you cannot create one without a system. You can still use grow templates on other systems.
As an example: When creating a template, you can specify parameters such as the amount of light a plant should receive at any given growth stage. This value can vary significantly based on a variety of factors, such as the amount of lights, wattage, efficiency or distance to the plant. We need these reference points to be able to adjust the parameters for the system you want to use the template on.
Can I modify the plant species of a grow template?
Each species has unique requirements and growth behavior, which is directly coupled to the grow template. Therefore, changing plant species after the creation of the grow template is not allowed.