Systems
A hydroponic system combines a set of planting containers, devices such as grow lights, water pumps, air pumps or fans, and reservoirs or other water tanks. There are various types of systems, ranging from DYI DWC systems built from plastic bottles, all the way to farm-scale NFT systems filling entire green houses.
The Elfsys App enables you to create an accurate reflection of the physical properties of your system and its component, which enables us to automatically tailor the growing process specifically to your conditions - whether you decide to build your own system or get our own Elfsys Grow Kit - a self-contained, ready-to-go DWC-based system compact in size and low in complexity.
Components and attributes
System types
The Elfsys App currently supports two types of systems: Deep Water Culture (DWC) systems and Nutrient Film Technique (NFT) systems.
This strict type differentiation will be removed in future versions of the Elfsys App, allowing you to create hybrid/DIY systems more flexibly.
Deep Water Culture (DWC)
In a Deep Water Culture (DWC) system, plants sit on a platform with their roots suspended in a bucket of water that contains oxygen and nutrients. This is a popular and easy way to grow plants hydroponically. You can even make your own simple DWC system using big plastic bottles.
When setting up a DWC system in the Elfsys App, these buckets are represented as containers.
Nutrient Film Technique (NFT)
A Nutrient Film Technique (NFT) system uses plastic tubes or channels that hold the plant roots. A thin layer of water with all the nutrients the plants need flows through these tubes and feeds the roots.
When setting up an NFT system in the Elfsys App, these tubes are represented as containers.
Containers
A container is the unit in your system that houses planting pots (in which plants are grown) in some way. In Elfsys Grow Cloud, it is the smallest unit that can form a grow batch. Common containers include:
- A DWC bucket;
- An NFT tube;
- An Aeroponics bucket;
- A seedling tray for germination and incubating, etc.
A system can have multiple containers. A Cultivation Module is a group of containers in the same system that grow the same plant together, which is the smallest unit to create a grow batch. The Elfsys App only allows you to grow one type of plant in each container or Cultivation Module, rather than mixed planting multiple types of vegetable in a single container.
We do not officially support mixing different types of plants in the same container or Cultivation Module to allow for maximum efficiency during the growing process. Although not recommended, if you really need to mix plants, you can set up your system in one of the following ways:
- Split the container into multiple containers;
- When creating/choosing a grow template, try to select a plant species with the least common denominator between the two species you are planning to grow. For example, when growing different species of lettuce in the same container, select any Lettuce template; when planting something less compatible such as tomatoes and bok choy, you can select Generic as the plant variety.
Currently we only support starting a grow batch in all containers of one system at the same time. This means that you can only grow one kind of plant at a time. We will support starting batches in subsets of containers in future versions of the Elfsys App.
DWC buckets
The planting containers of a Deep Water Culture (DWC) system are called buckets. They have the following parameters:
- Water capacity. Represents the volume of water that the container itself can store. Will be taken into consideration when issuing refill notifications based on estimated water consumption.
Example screenshot of the DWC bucket configuration page

NFT tubes
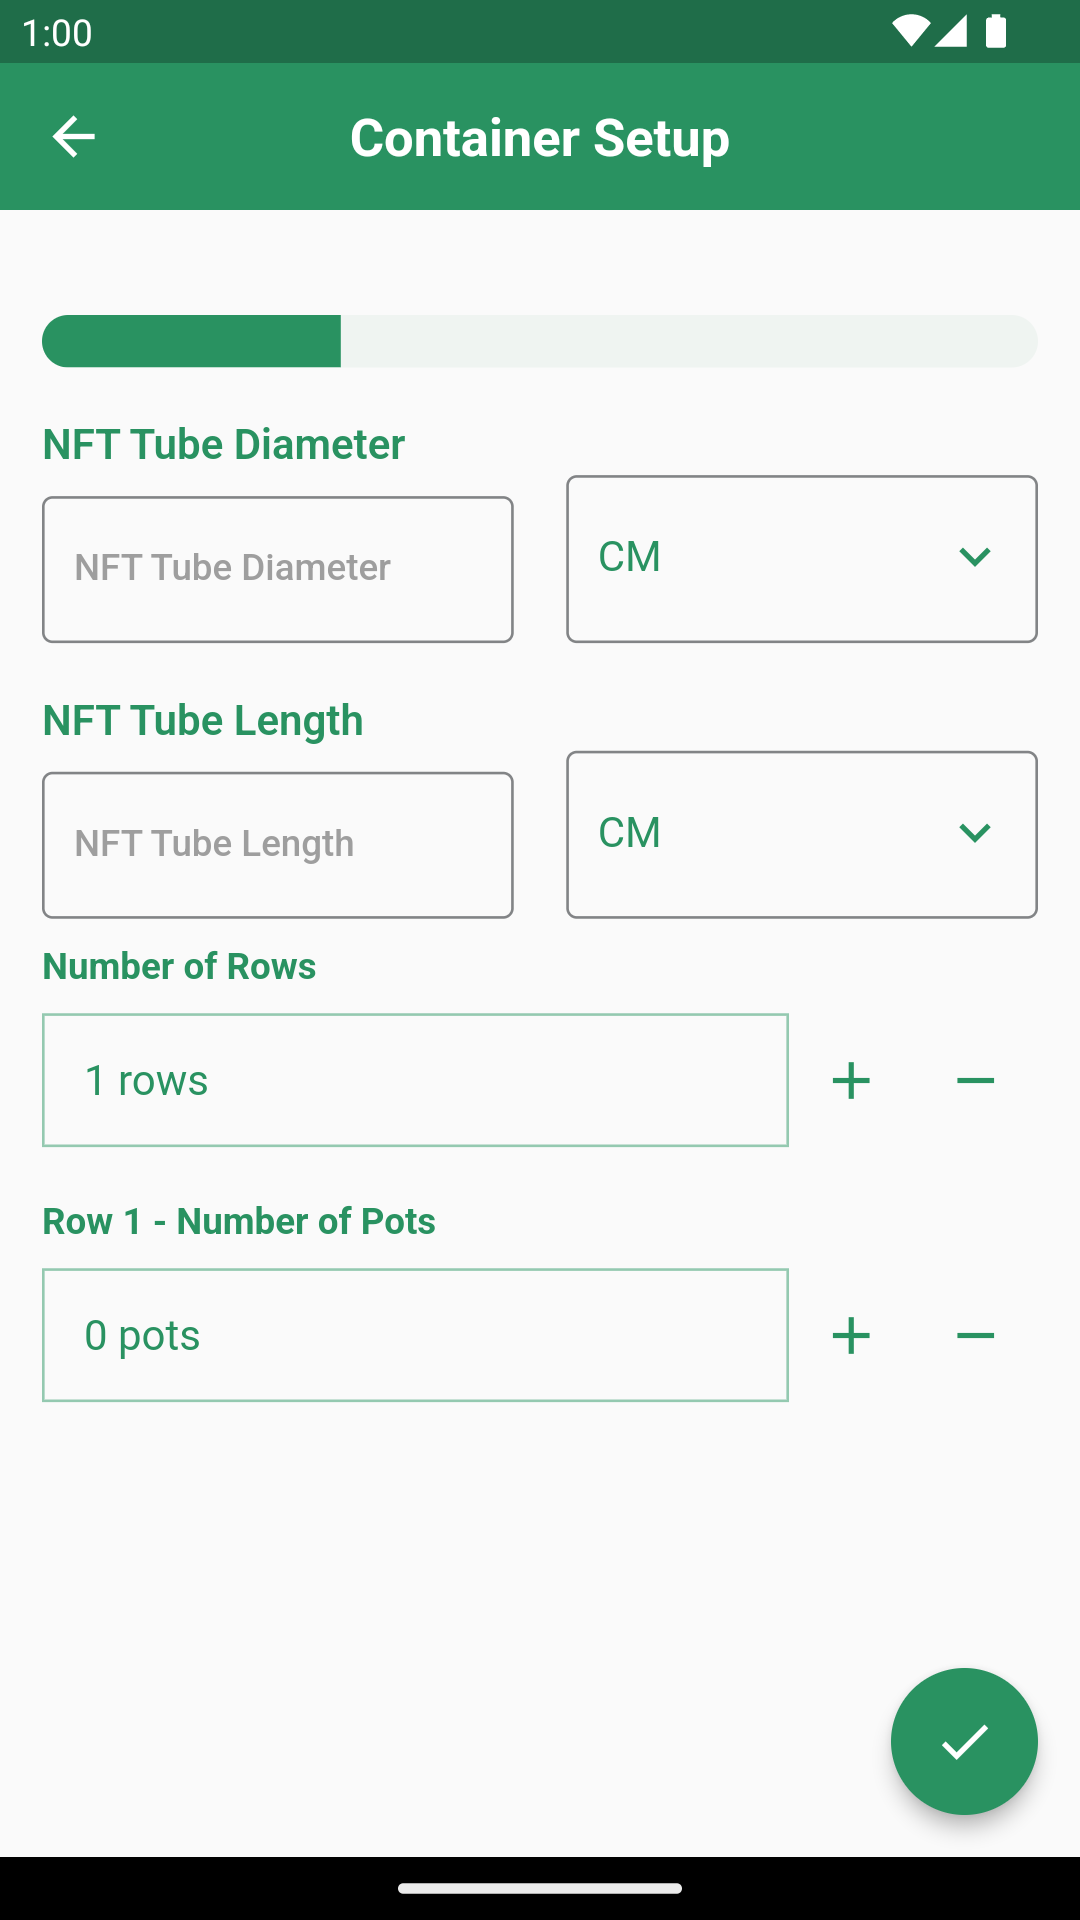
The planting containers of a Nutrient Film Technique (NFT) system are called tubes. They have the following parameters:
- Diameter and length;
- Number of rows.
Elfsys Grow Cloud currently assumes that NFT tubes cannot store water themselves. However, new tube designs are coming up that allow storage of a small amount of water (usually 1-2 liters). If you have such tubes, please add a reservoir to the system to accurately reflect the actual amount of water contained within the system.
In future versions of the Elfsys App, this workaround will no longer be needed.
Example screenshot of the NFT tube configuration page
Devices
A system requires devices to operate. Each type of device provides different functionality:
- Grow lights provide lighting for plant growth;
- Water pumps circulate the nutrient solution in the system;
- Air pumps can enrich water in DWC buckets and reservoirs with additional oxygen;
- Fans increase air circulation around the system.
When a grow batch is running on a system, the Elfsys App will generate and automatically execute a grow plan based on devices and their attributes being used in the system and container.
Reservoir
Reservoirs are water tanks that store nutrient solutions in addition to the containers in the system. Together with containers, their water capacity is taken into consideration when issuing refill notifications based on estimated water consumption.
System management
Add new DIY system
This is for DIY grow system only. For Elfsys Grow Kit, a system is automatically created when you activate the kit.
To get started with Elfsys Grow Cloud, you'll need to create a DIY system.
- Tap the button on the home page, on the next page, tap Add a DIY system instead?.
- Enter a name and select a system type, tap .
If your system type does not match DWC or NFT, for example Aeroponics or seedling tray/incubator, choose DWC to create the system. We will make this process more flexible in the future.
Connect smart power outlets
- Here you see the smart power outlets linked to your account and how they are being used. Make sure all the power outlets required by devices in this new system have been correctly connected. If not, tap the tuya button in the middle of the page to add more outlets. For more information, check out the related documentation. Tap to continue to the device configuration page.
Add devices and reservoirs
- This page shows all the devices and reservoirs that have been added to the current system. If you are creating a new system, this page will be empty at first. To add devices and reservoirs from your inventory, tap the button at the bottom right of the page.
Example screenshot of the Components page
This screenshot shows the initial state of the screen before any components are added.

This screenshot shows a fan (My Fan) and a reservoir (My Reservoir) that have been added to the system. You can tap the
button at the bottom right to add more devices and reservoirs.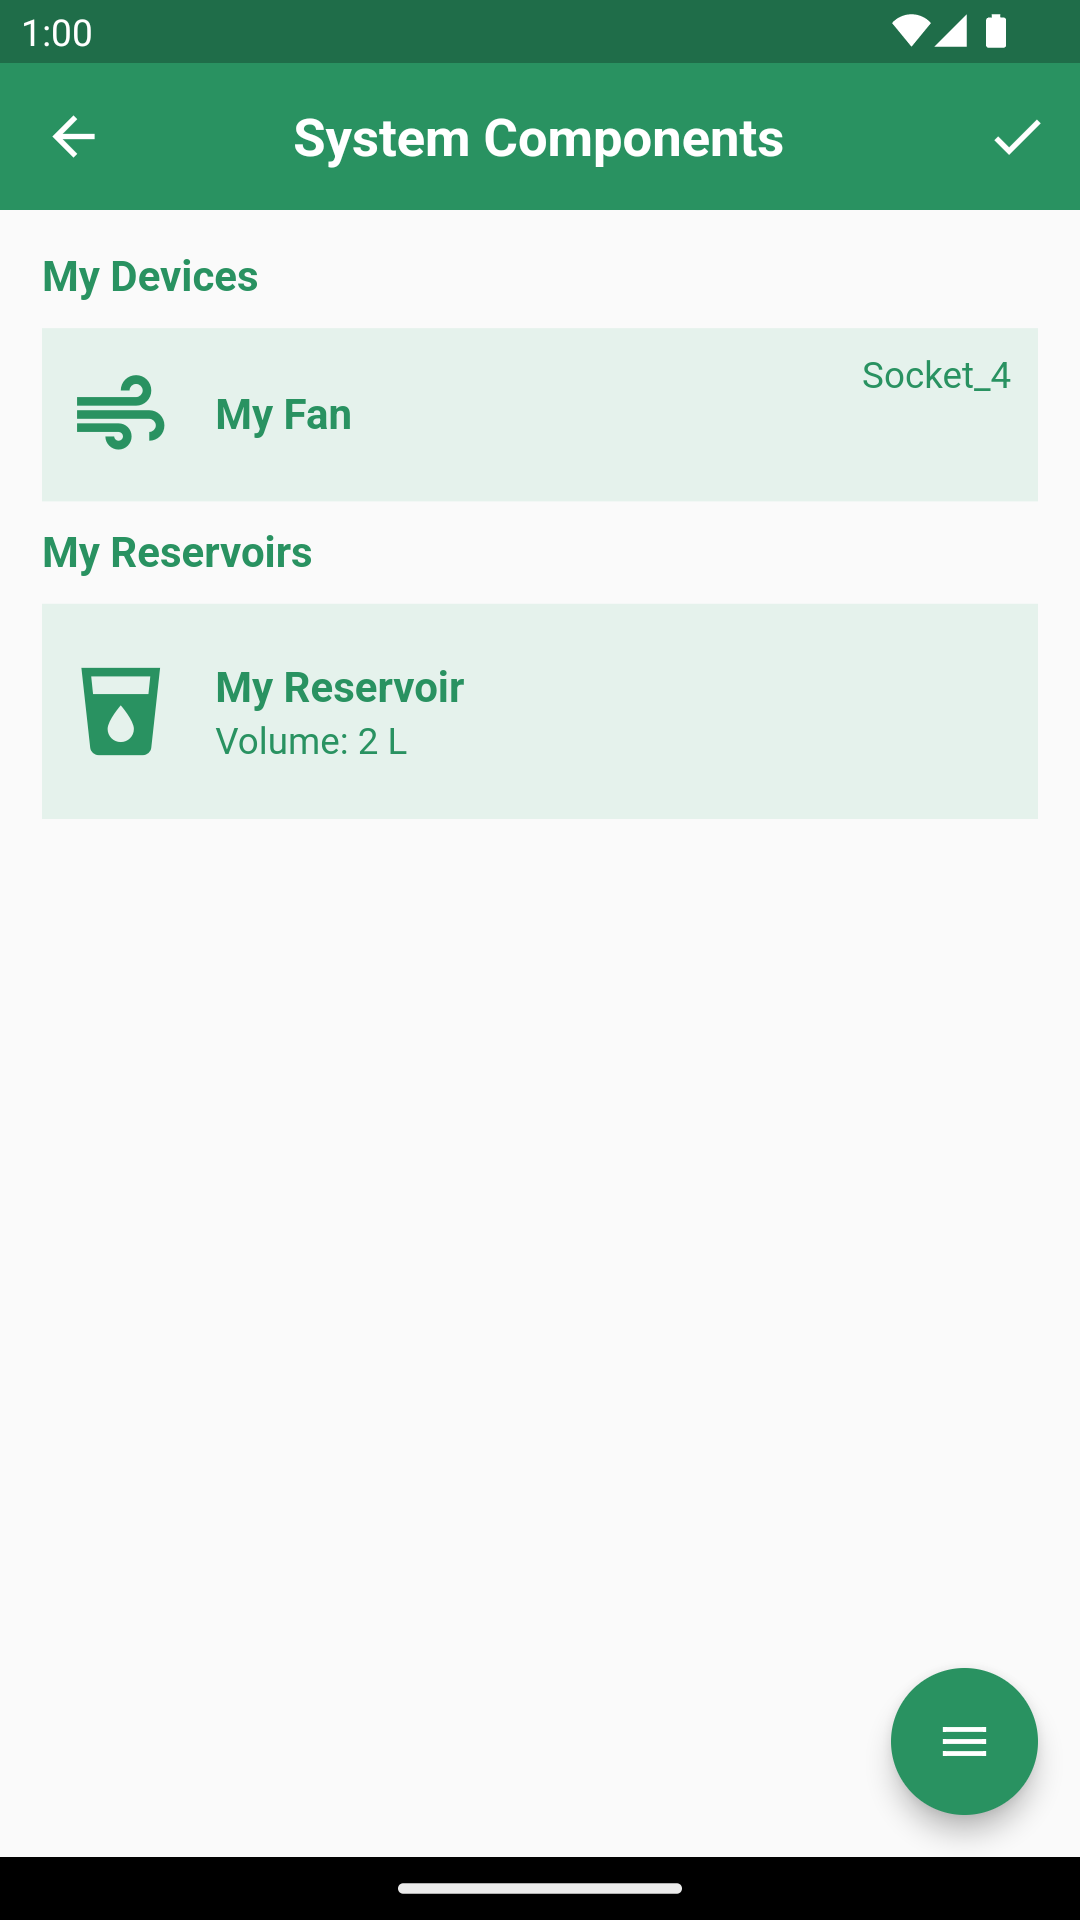
- Your inventory page shows all the devices and reservoirs that are not used by any other system. You can tap the button next to the name of those needed to select them. When you are done, tap the button at the bottom right to add them to your system. If you need a new component, tap the button at the bottom right to create one. You can read how to create a device or reservoir in corresponding documentations.
Example screenshot of adding a device to the system
This screenshot shows that you have no idle devices in your inventory. This could mean that you have not created any devices yet, or that they are all occupied by other systems. To create a new device, click the
button in the lower right corner.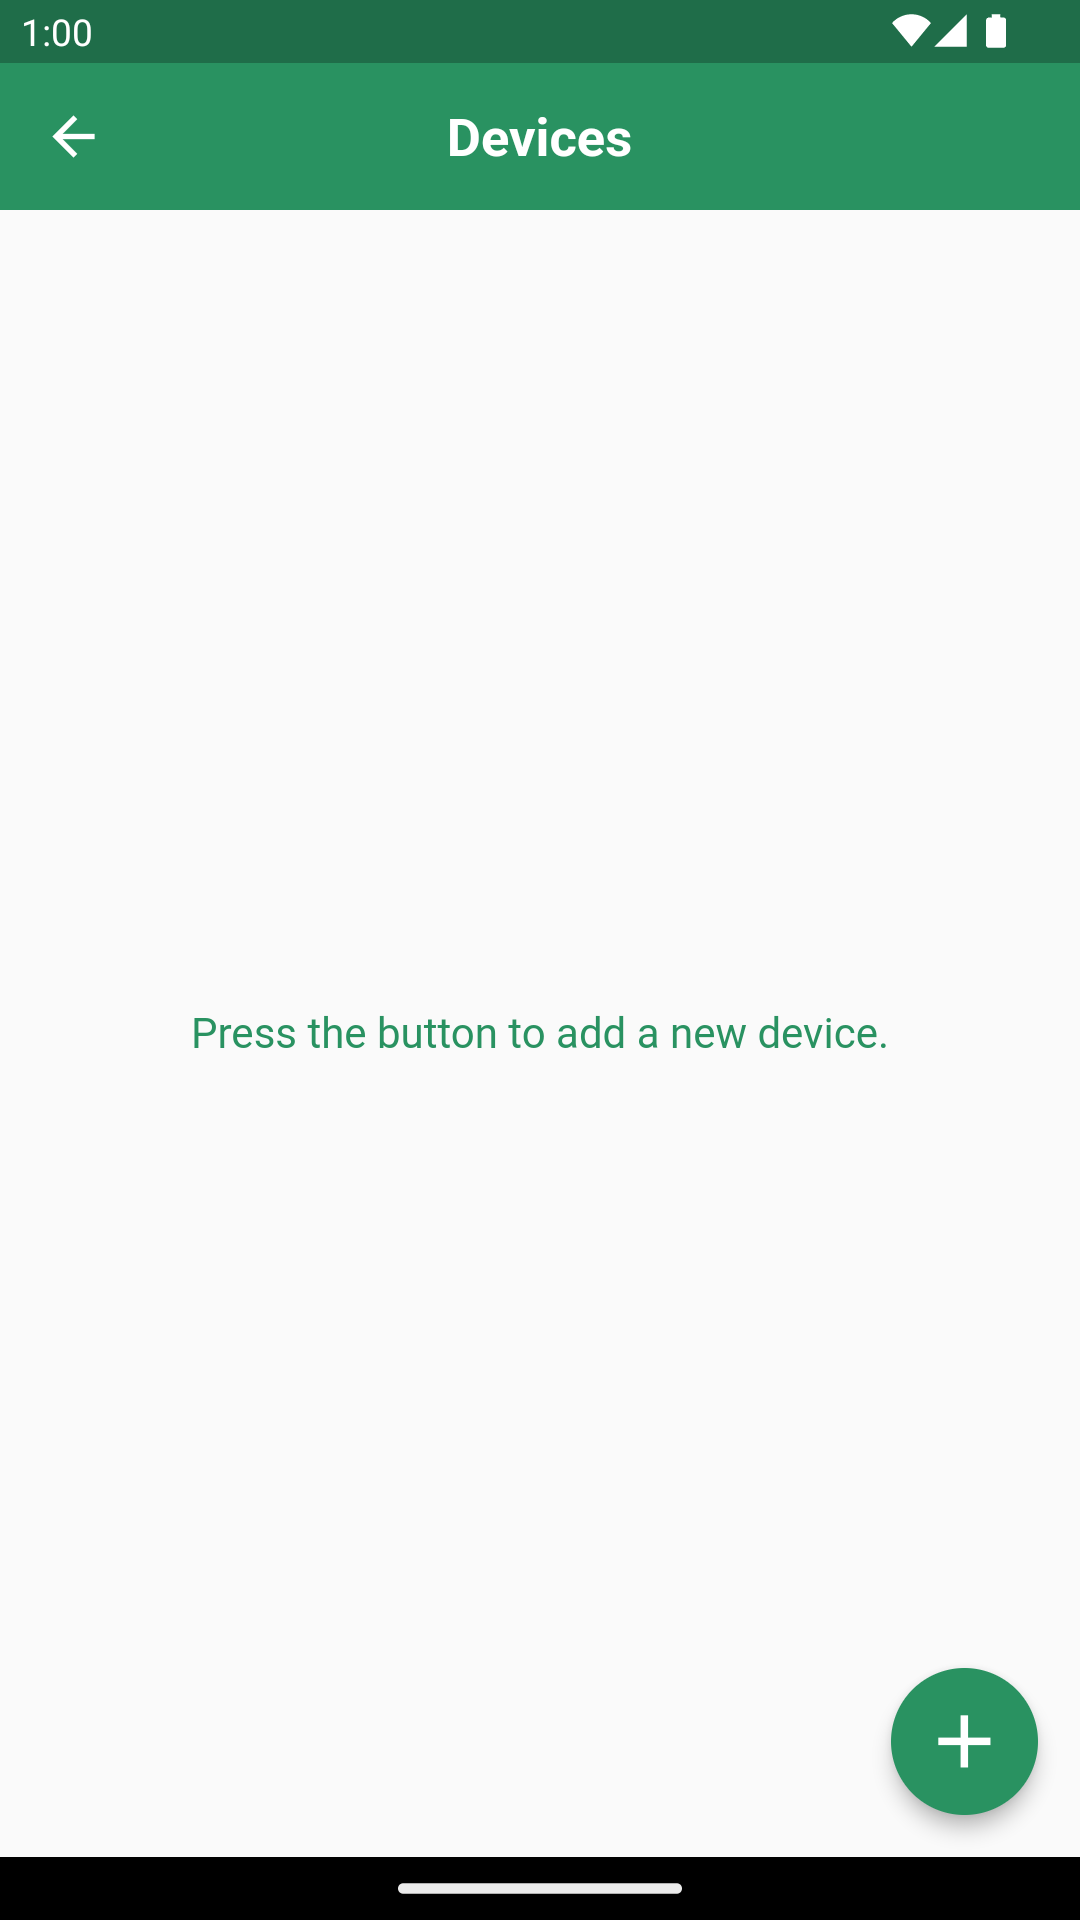
The screenshot shows that you have some idle devices in your inventory - devices that are not connected to any system. For example, you can see a fan (My Fan) in the screenshot. You can add this fan to the current system.
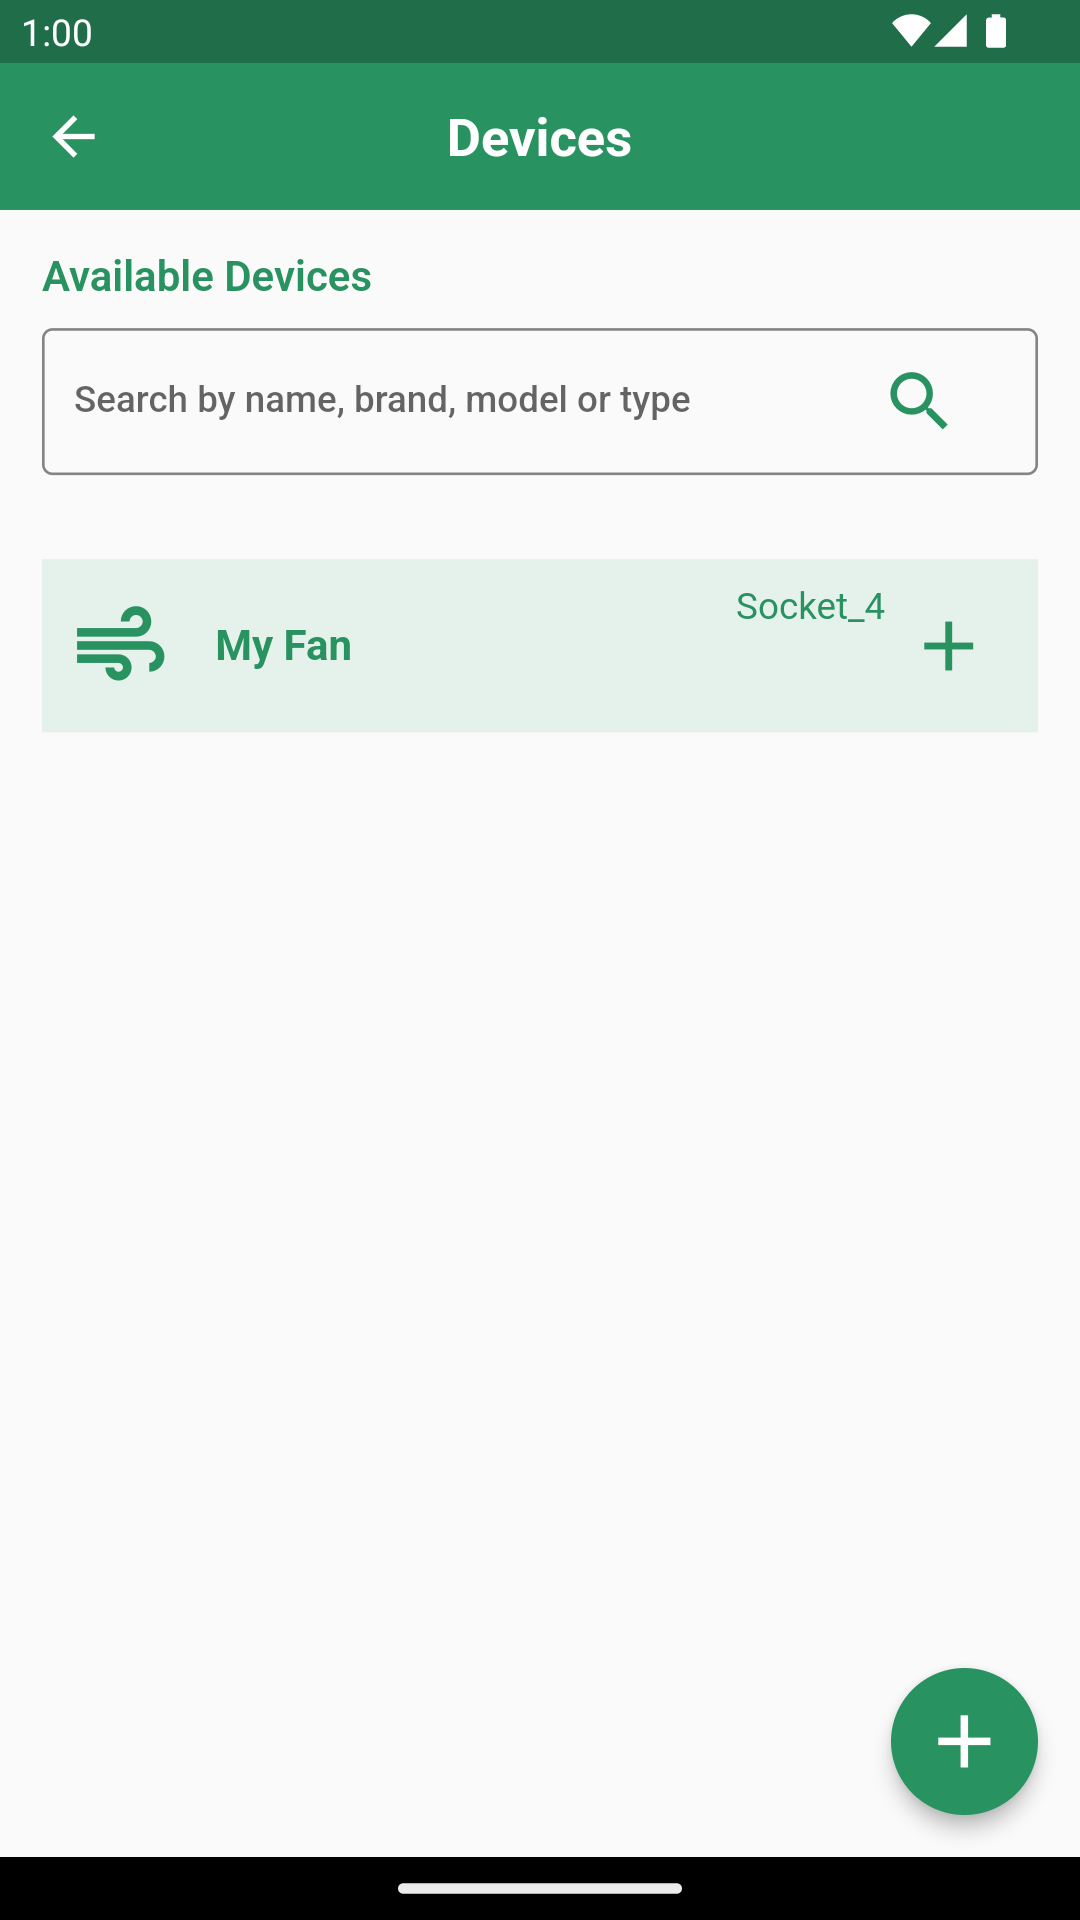
This screenshot shows that you have selected some idle devices in your inventory. For example, you have selected a fan (My Fan). To add the selected device to the current system, click the
button in the lower right corner.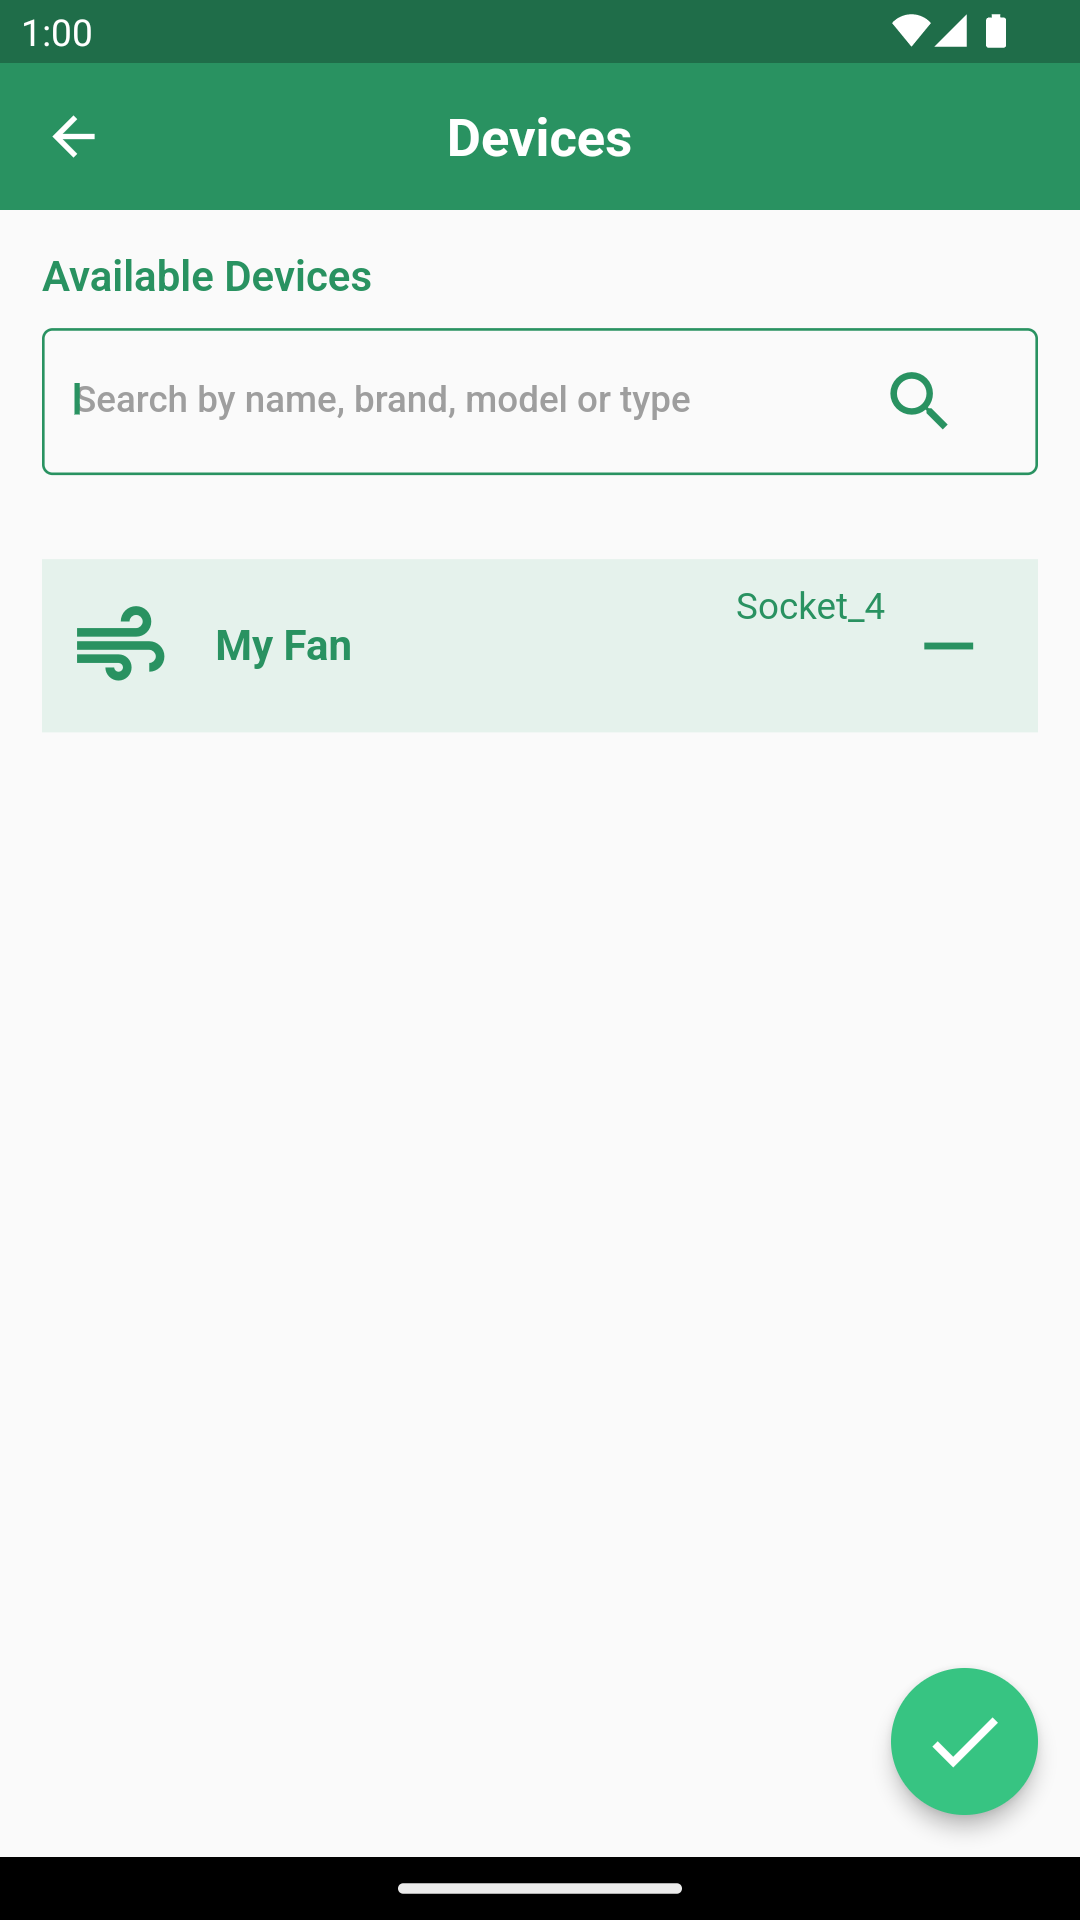
- Click the button in the upper right corner.
Add container
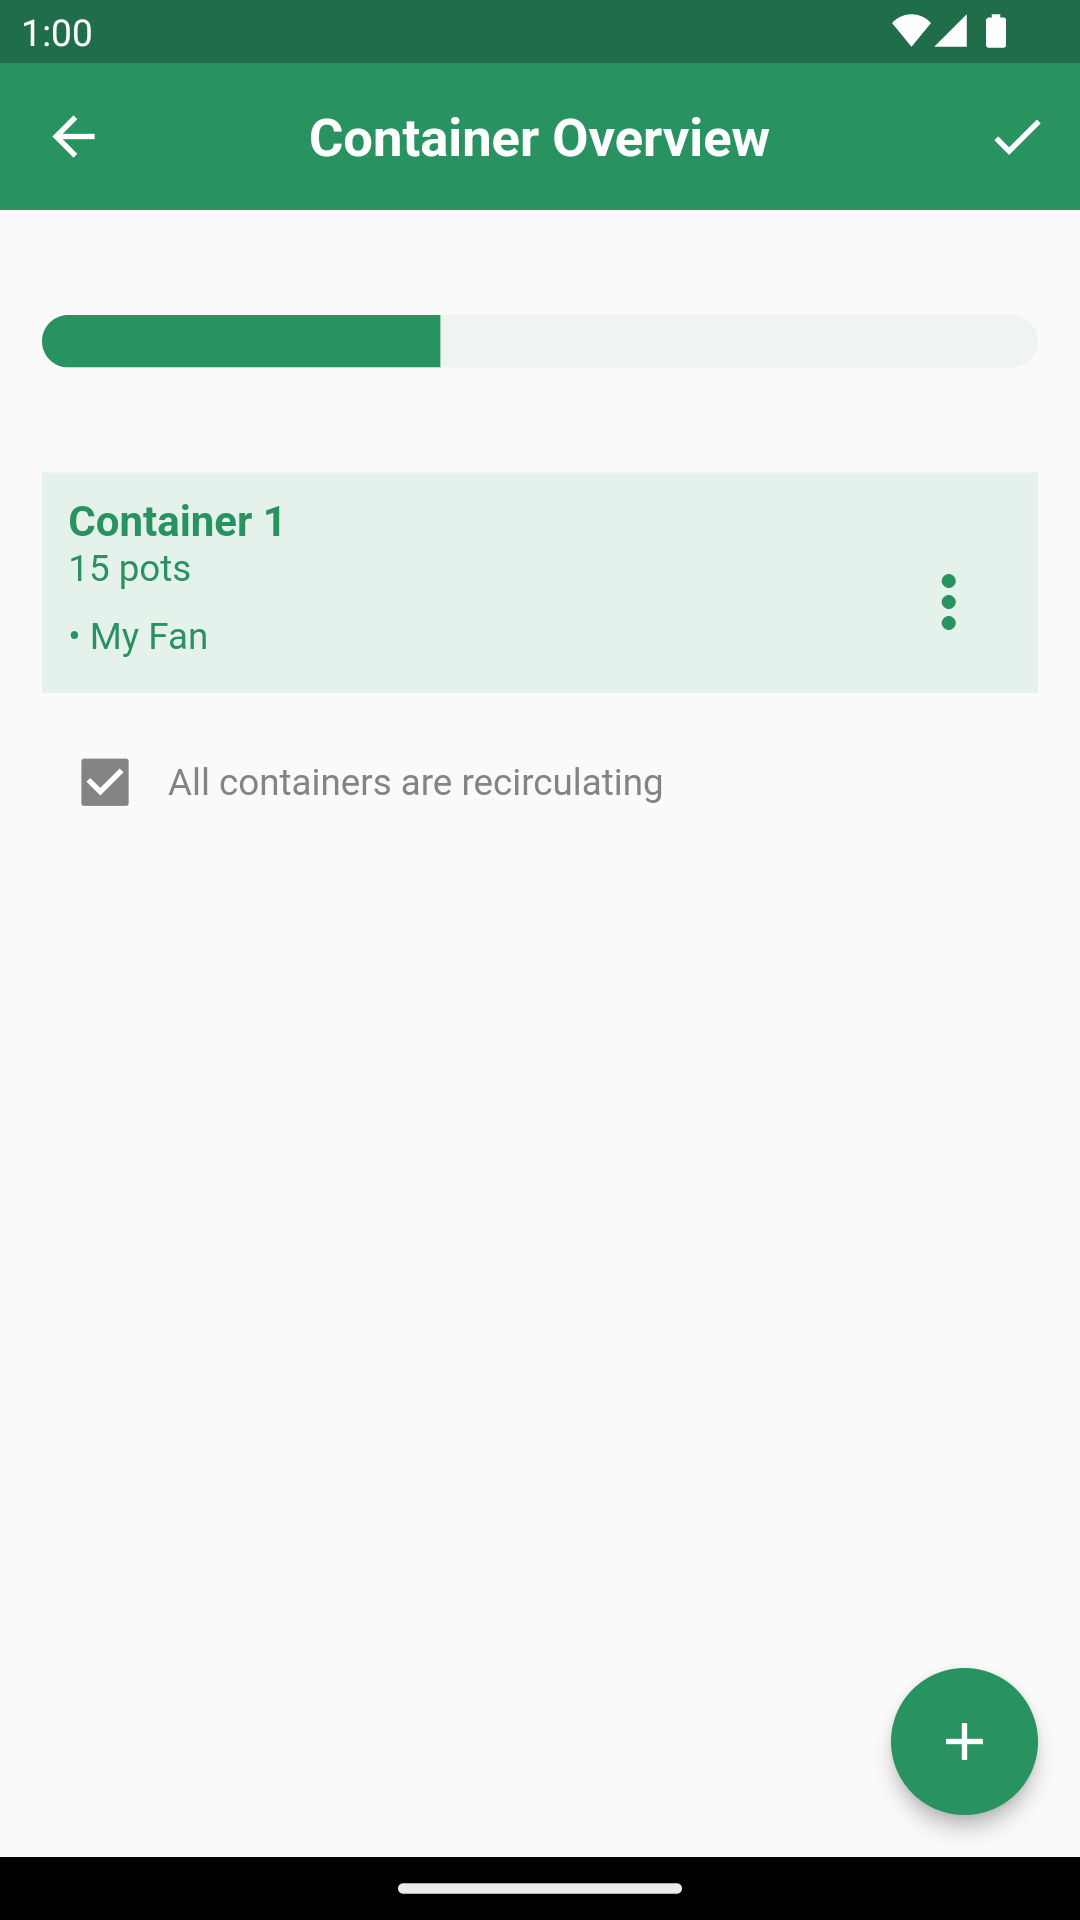
- The system container page shows all the containers in the current system. To create a new container, click the button in the lower right corner of the page. If the system type is DWC, you can select All containers are recirculating to specify that all reservoirs and buckets in the system are linked by tubes and that the nutrient solution flows between all of them. If not selected, it means that each bucket has its own water supply.
Example screenshot of the System Container page
This screenshot shows that no container exists yet. To create a new container, click the
button in the lower right corner.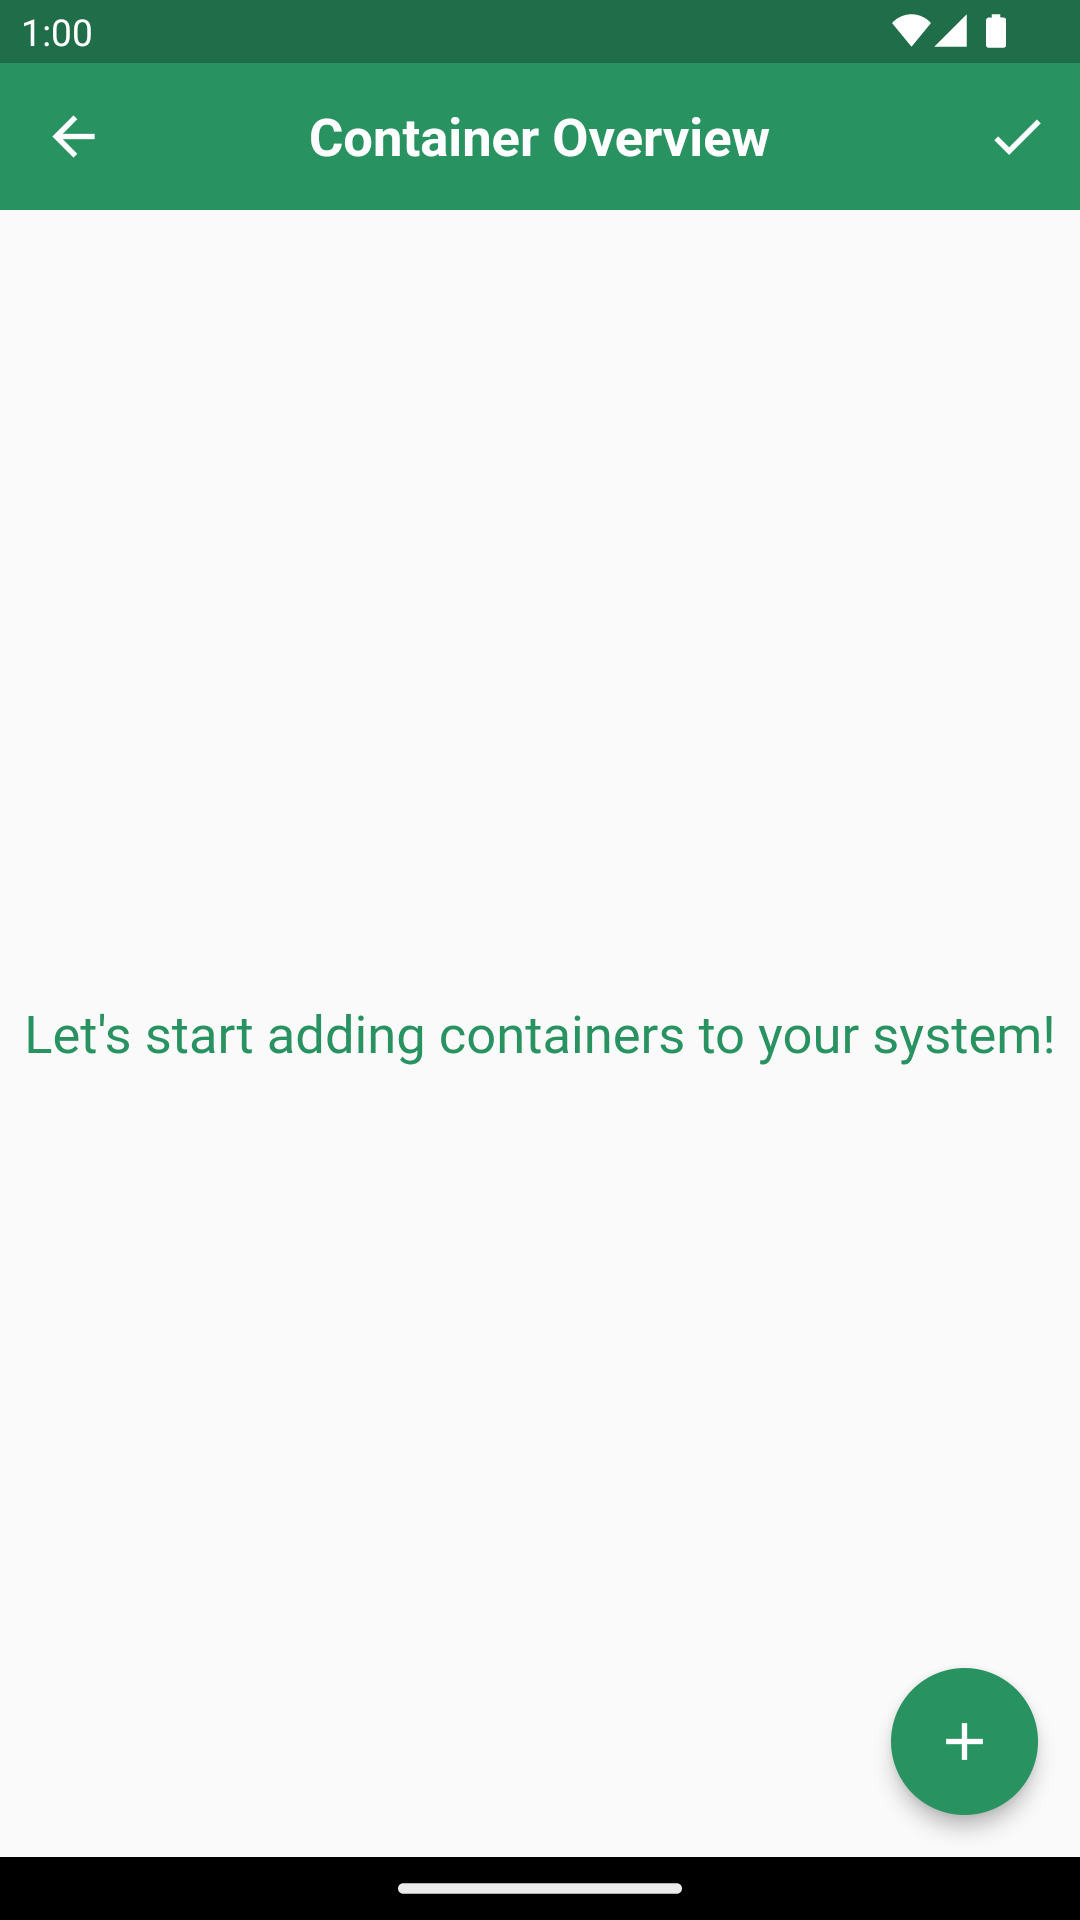
This screenshot shows an NFT tube named Container 1. You can add more containers by clicking the
button in the lower right corner. This is for NFT system type only.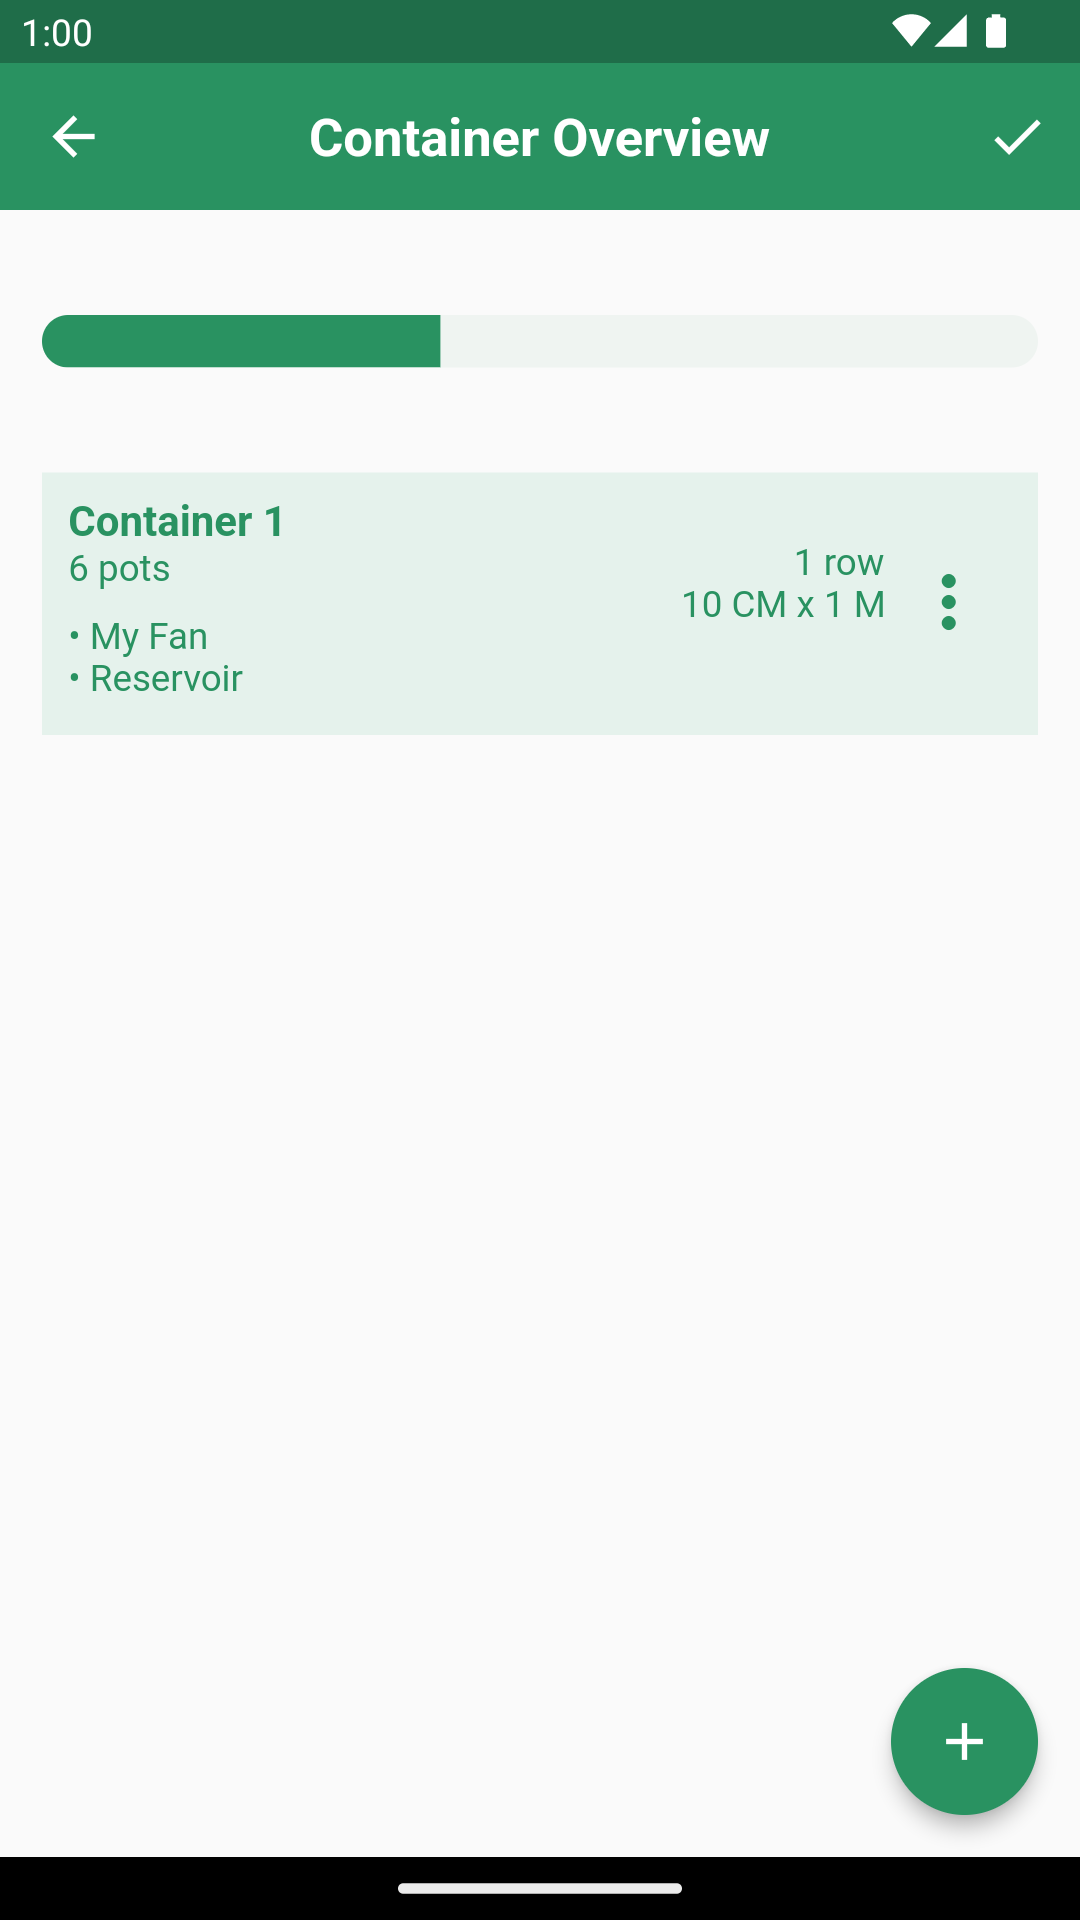
This screenshot shows a DWC tube named Container 1. For DWC systems, you can also select the All containers are recirculating option.
- Enter the container attributes based on your system type and the page prompts. Click the button in the lower right corner when done. For more information on different container types, read the related documentation.
- Select the devices and reservoirs that will be used by your container. For example:
- If your container has LED lights, select them even if they are shared with other containers. This lets you control the lighting of this container.
- If your container is connected to a reservoir, select it even if it is shared between all containers.
Click the
button next to each device or reservoir that you want to use for your grow batch. This will affect how we create your grow plan. Devices that are not added to a container will be ignored. When you are done, click in the lower right corner.If a device is shared by all containers in the system (such as a water pump that circulates water across of the whole system), you need to add it to every container. Otherwise, we will assume that this device is not used at all.
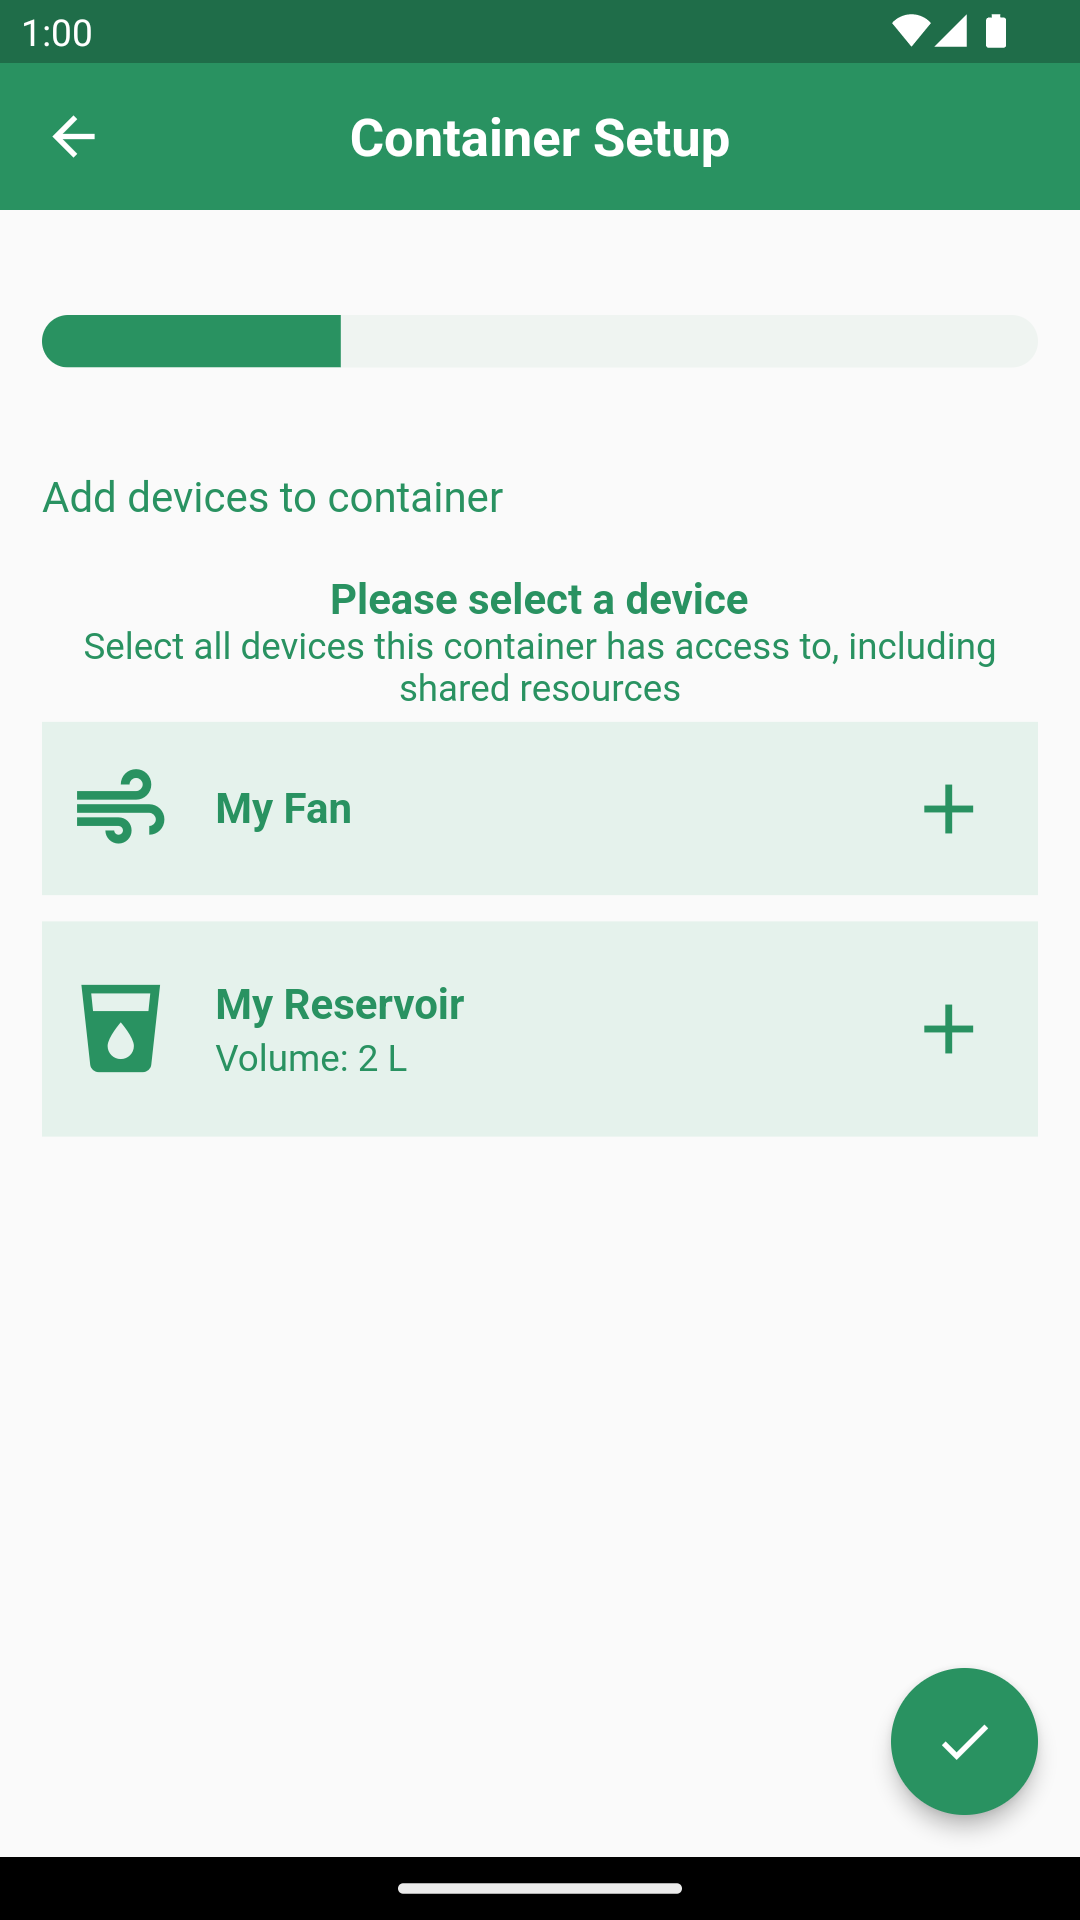
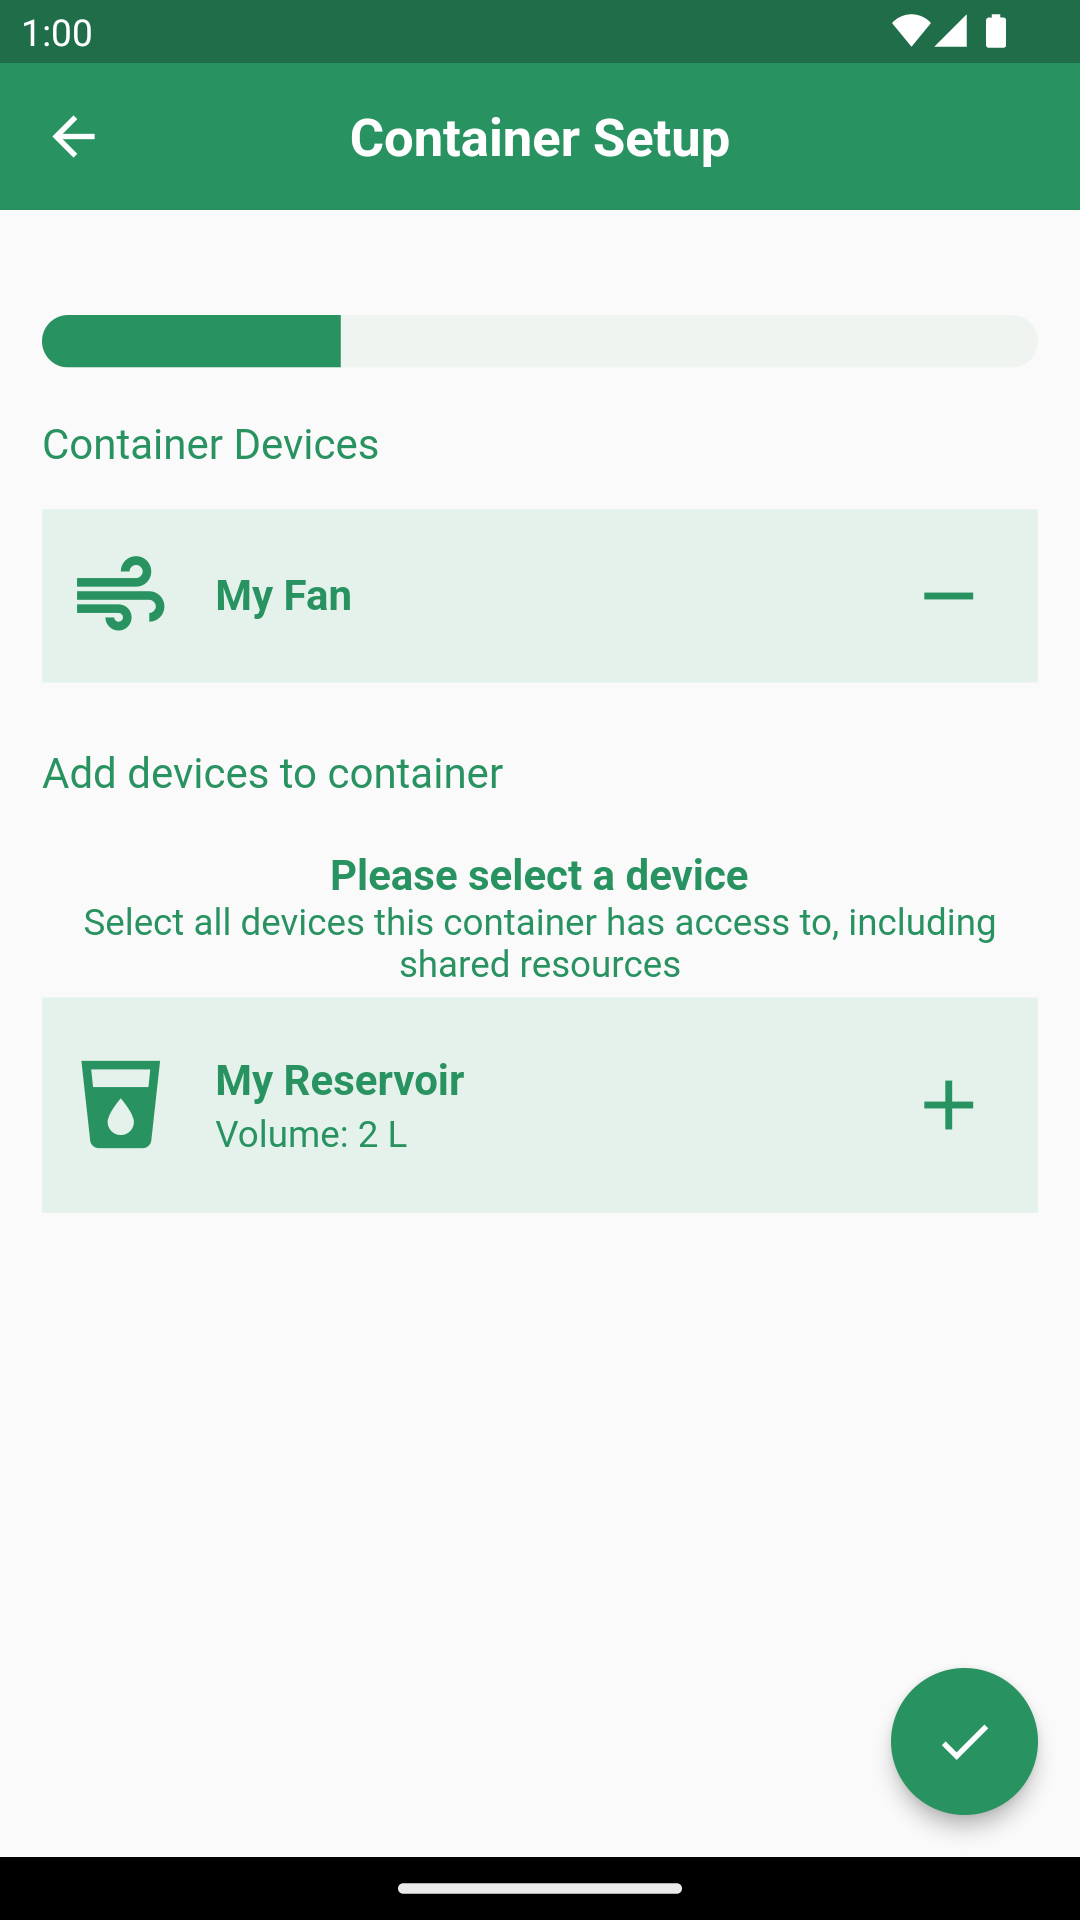
Example screenshot of the Container Setup page
This screenshot shows that you can add My Fan and My Reservoir to your current container.
This screenshot shows that you have added My Fan, but not My Reservoir, to your current container.
- The system container setup page will show all existing and new containers. If you have added all containers, click in the upper right corner to finish creating a new system.
View systems
To view your existing systems, tap Systems on the home page. It can also be done by accessing the
settings via the home page, then navigating to Manage Systems.Select a system to see its devices, reservoirs, and containers. If at least one container is idle, you can tap Start Growing in the lower right corner to begin a new grow batch. Otherwise, you will see the See Ongoing Batch button, which will redirect you to the corresponding Cultivation Module upon tapping. For more details, read the related documentation.
Modify system
You don't need to change your system settings unless you modify your system. Make sure there are no active grow batches before you do so.
- Access the settings via the home page, then navigate to Manage Systems and select the system to be modified.
- Tap the three in the upper right corner and select Modify System.
- Follow the procedure outlined in steps 4~10 of the add new system flow.
Rename system
A system will be named My [system type] System when it is created. You can rename the system on the system overview page. When you have multiple systems, we strongly recommend that you name each system for easy identification and management.
- Access the settings via the home page, then navigate to Manage Systems and select the system to be renamed.
- Tap the three dots in the upper right corner and select Rename.
- Enter a new name and confirm it with the enter key on your phone's keyboard.
Delete system
Deleting a system will also erase its configurations and historical data, such as water level and volume estimates. This data cannot be restored.
To delete a system that you don't use anymore, make sure it has no active grow batches. The devices and reservoirs linked to this system will be freed and can be added to other systems later.
- Access the settings via the home page, then navigate to Manage Systems and select the system to be deleted.
- Tap the three in the upper right corner and select Delete.
- Confirm the operation in the prompt.
Frequently asked questions
Can I create a system without any smart power outlet?
This is a planned feature which is not yet supported. For now you can contact support, and we can create a virtual power outlet that allows you to set up these devices as a workaround. Keep in mind that Elfsys Grow Cloud won't be able to control your devices with virtual power outlets.
How to create a system that is neither DWC nor NFT?
We will add support for more system types in the future. Until then, if you want to use a different system other than DWC and NFT, such as Aeroponics or seedling tray/incubator, simply select DWC and configure the properties as best you can.
My device or reservoir is already used in another system, can I also add it to a new system I'm creating?
As a system in the Elfsys App is a virtual representation of your physical system, devices and reservoirs cannot be shared between multiple systems.
If you have multiple systems that simultaneously share devices or reservoirs, please treat them as one system in the Elfsys App.
If you wish to migrate a device from one system to another, you will first need to remove it from the current system before you can add it to the new one.