Installation
Select your Elfsys Grow Kit version from the tabs below to view the manual.
- 2 Layers
- 3 Layers
- 4 Layers
Check parts
Your package will include 1 primary grow container box and 1 secondary grow container box. Before installation, please check the parts according to the photo and item list below.
Primary grow container box
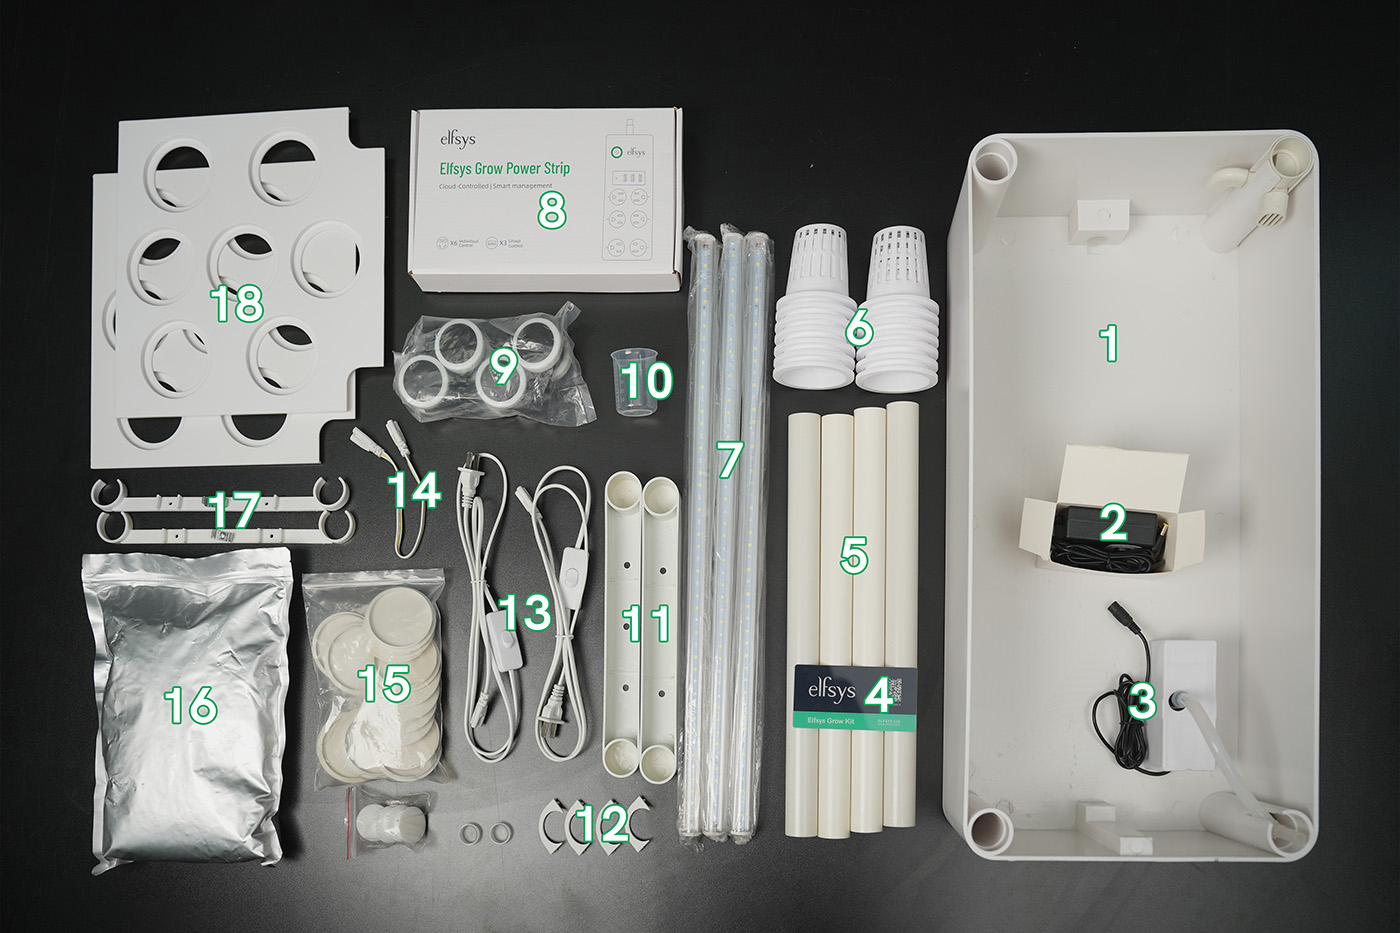
| No. | Name | Quantity | Unit | Note |
|---|---|---|---|---|
| 1 | Primary grow container | 1 | piece | |
| 2 | Water pump power supply | 1 | piece | |
| 3 | Water pump and filter assembly | 1 | set | Pre-installed by default |
| 4 | QR code nameplate | 1 | piece | |
| 5 | Support columns | 4 | piece | |
| 6 | Net pots | 14 | piece | |
| 7 | T5 LED grow lights | 3 | piece | |
| 8 | Elfsys Grow Power Strip | 1 | piece | |
| 9 | Locking caster wheels | 1 | set | 4 per set |
| 10 | Measuring cup | 1 | piece | |
| 11 | Support beams | 2 | piece | |
| 12 | Corner covers | 1 | bag | 4 per bag |
| 13 | Grow light power switch cords | 2 | piece | |
| 14 | Grow light connecting cords - short | 1 | piece | Approximately 12 inches long |
| 15 | Empty hole covers | 1 | bag | 12 per bag |
| 16 | Clay pebbles | 1 | bag | |
| 17 | Grow light mounts | 2 | piece | |
| 18 | Grow container covers | 2 | piece |
A converter is included in the box if your address is located in a region that does not use Type B or I plug standards.
For international orders shipped in December 2024 and onwards, 1 additional T5 LED grow light and 1 grow light mount are also included as spare parts.
Secondary grow container box
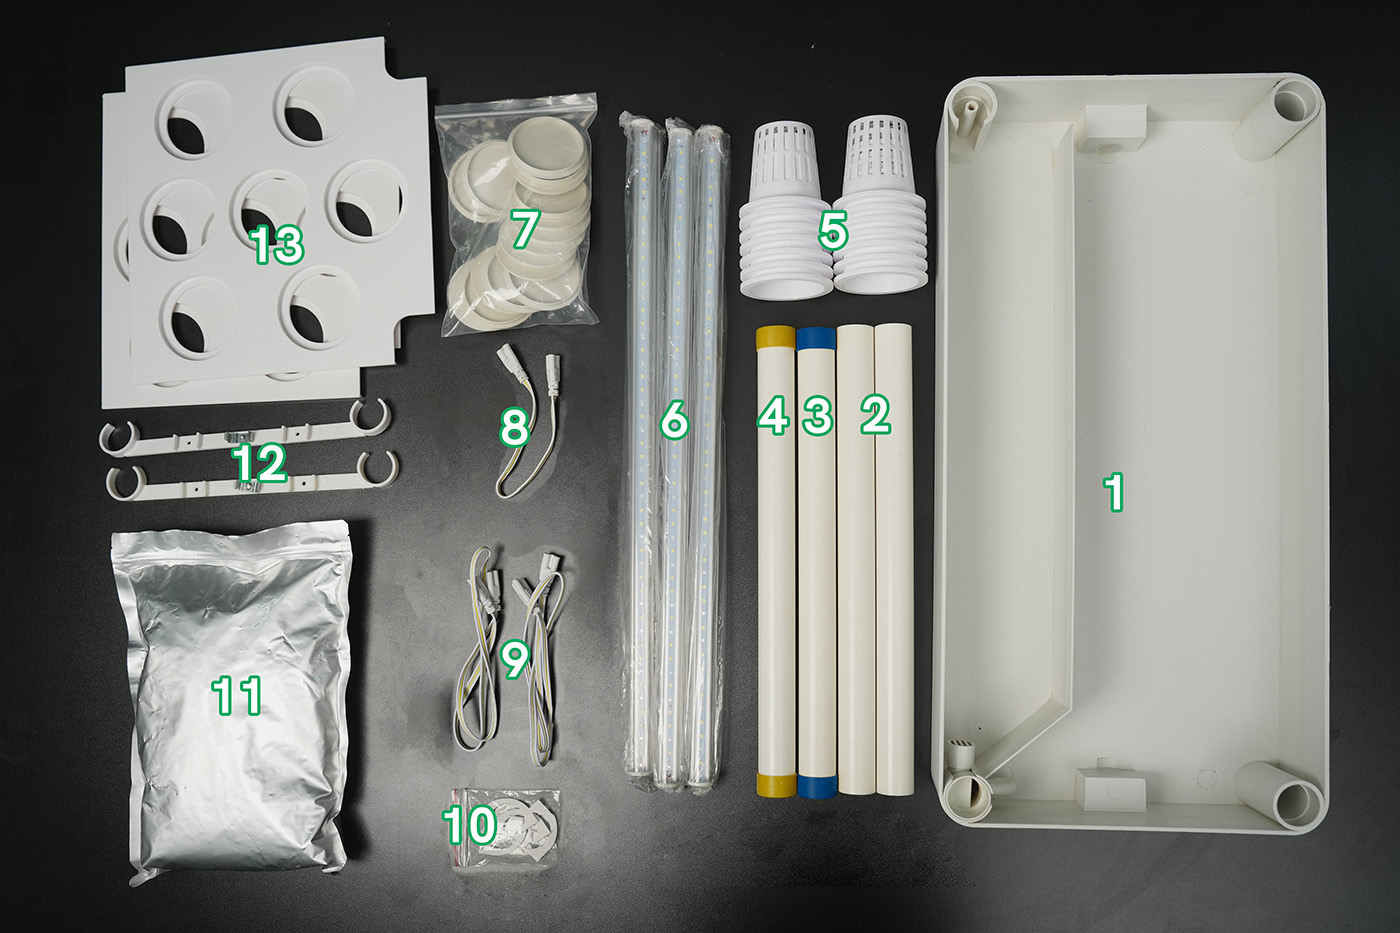
| No. | Name | Quantity | Unit | Note |
|---|---|---|---|---|
| 1 | Secondary grow container | 1 | piece | |
| 2 | Support columns | 2 | piece | |
| 3 | Feed column | 1 | piece | With blue protection caps |
| 4 | Drain column | 1 | piece | With brown protection caps |
| 5 | Net pots | 14 | piece | |
| 6 | T5 LED grow lights | 3 | piece | |
| 7 | Empty hole covers | 1 | bag | 12 per bag |
| 8 | Grow light connecting cords - short | 1 | piece | About 12 inches |
| 9 | Grow light connecting cords - long | 2 | piece | About 30 inches |
| 10 | Corner covers | 1 | bag | 4 per bag |
| 11 | Clay pebbles | 1 | bag | |
| 12 | Grow light mounts | 2 | piece | |
| 13 | Grow container covers | 2 | piece |
Assemble the kit
Let's begin assembling the Elfsys Grow Kit. In addition to the text tutorial provided below, you can also view this video.
Assemble primary grow container
The primary grow container is the lowest layer of the Elfsys Grow Kit and also serves as the kit's main nutrient reservoir. Each kit only has one primary grow container.
- Install the four locking caster wheels to the four bottom corners of the primary grow container.
- Connect the water pump power supply. The primary grow container is pre-installed with a water pump and its filter assembly. Turn off the power switch and connect the power supply to the pre-installed water pump. Check if there is a rubber plug in the water inlet corner. If there is, remove it as it won't be used.
The water inlet corner is the closest to the water pump, which has a soft tube connected to the water pump.
- Keep the remaining parts aside, the support columns and beams are installed to the top layer of the kit. You do not need to install grow lights, support columns and net pots now.
Assemble secondary grow container
The secondary grow container is an expansion module that can be added on top of the primary grow container. Each grow kit can add up to 3 secondary grow containers. Each secondary grow container can add 14 net pots, 45W of artificial light output, and 1.85 gallons (7 liters) of nutrient solution.
- Install the feed column. Identify the feed column with blue protective caps. The feed column has two rubber seals at both ends and one internal water feed tube. When installing onto the primary grow container below, first insert the feed tube inside the feed port of the primary grow container into the small hole of the seal at either end of the feed column, then insert the feed column into the primary grow container. When installing onto another secondary grow container below, directly insert the feed column into the feed slot of the secondary grow container. You can twist and tap the feed column to ensure it is fully inserted.
Actual photo of the feed slots
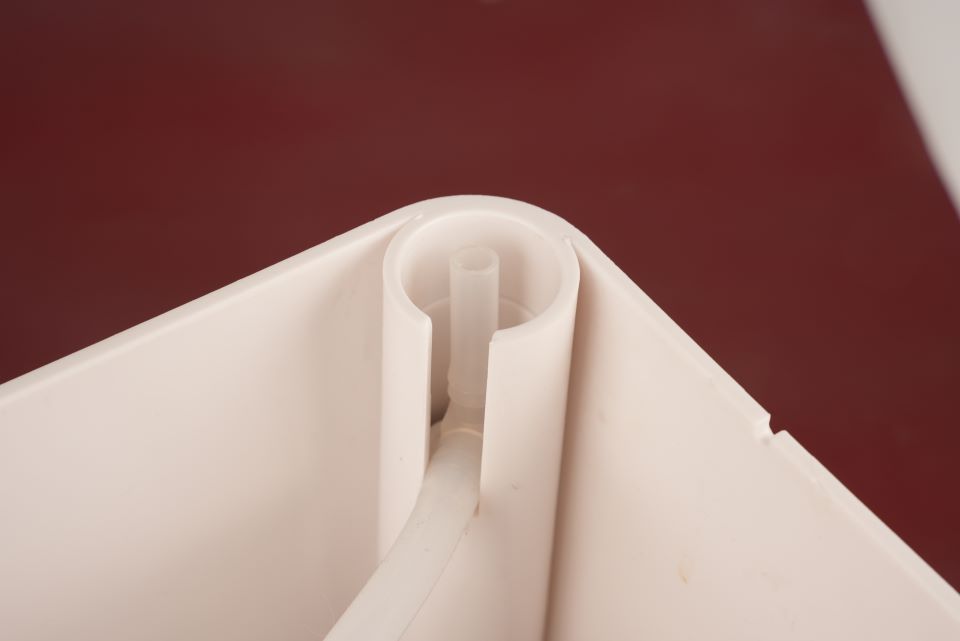
The feed slot of the primary grow container. It contains a plastic water feed tube connected to the water pump.
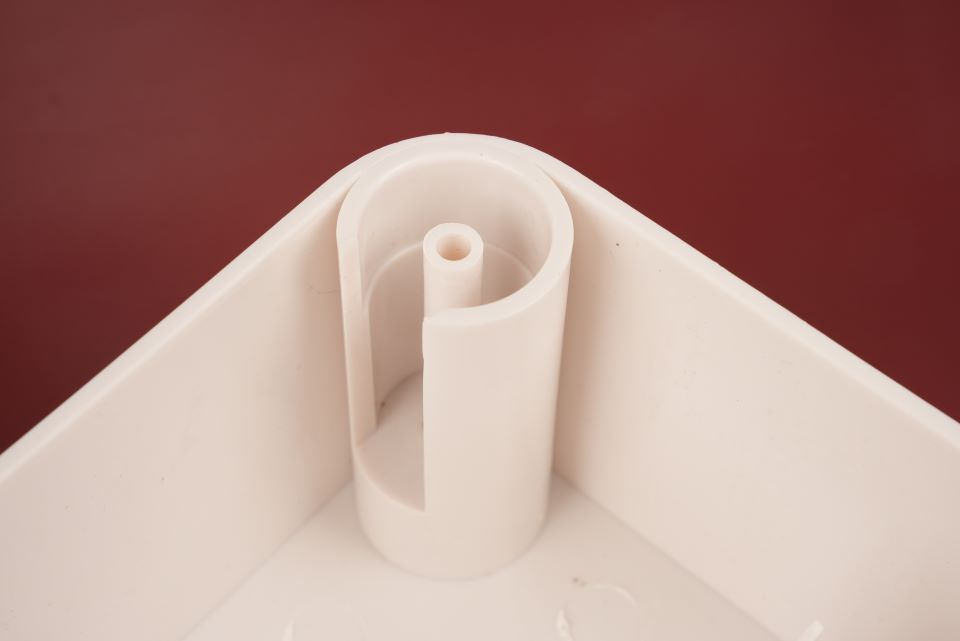
The feed slot of the secondary grow container.
- Install the drain column. Identify the drain column with brown protective caps. Be sure to distinguish it from the feed column. The drain column must be inserted in the drain slot of the grow container.
Actual photo of the drain slot
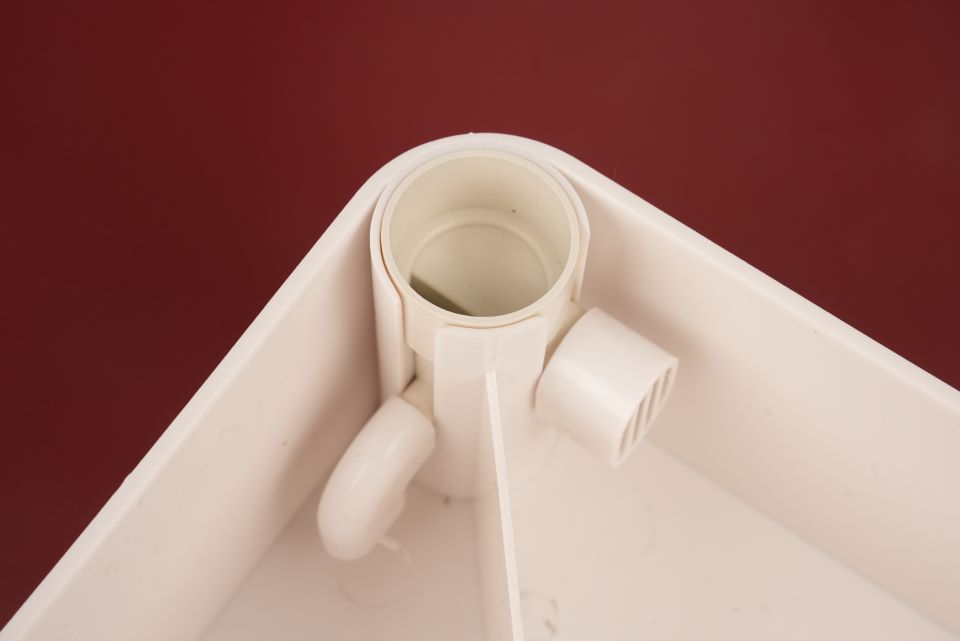
- Install the support columns. Insert the remaining two columns into the remaining two slots of the grow container at below. Twist and tap the columns to ensure they are fully inserted.
- Install the secondary grow container. Align the feed slot at the bottom of the grow container with the feed column, the darin slot with the drain column, and the other two corners with support columns. After alignment, press down hard on the secondary grow container, then tap the four corners to ensure all columns are fully inserted on both ends.
Actual photo of slots at the bottom of the grow container
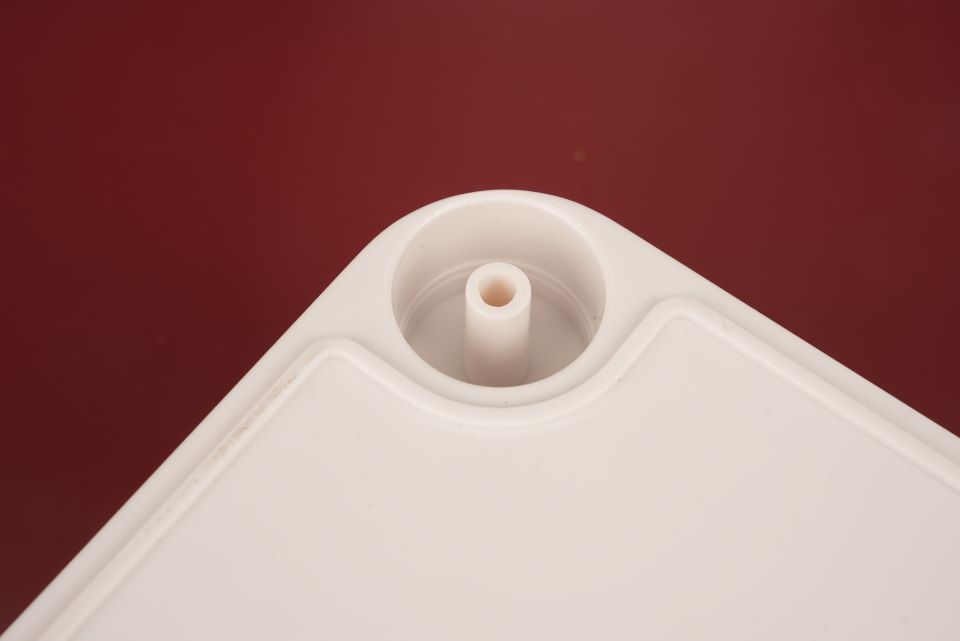
The feed slot at the bottom of the secondary grow container.
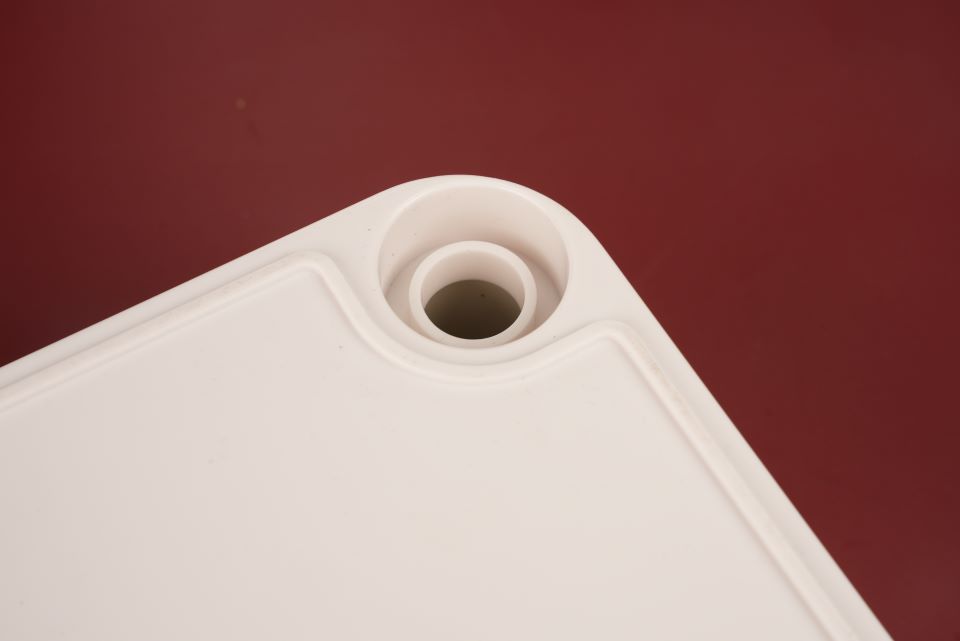
The drain slot at the bottom of the secondary grow container.
- Repeat the above steps to install the remaining secondary grow containers.
- Take out the four support columns and the two support beams from the primary grow container box. Install the support columns at the four corners of the topmost secondary grow container. Group two columns on the short side and install the support beams on them.
Install grow lights
With the grow light mount column slots opening facing outwards, insert one end of the each grow lights into each light slots, then clip on another grow light mount in the same manner on the opposite side. Then, tilt the entire light assembly and place it in between the grow container columns. First, from one side, press the grow light mount until it snaps onto the two columns, then adjust the height of the opposite side and snap onto the other two columns.
Install grow container covers and corner covers
Install the grow container covers. Align the slots on the grow container covers to the side walls of the grow container, then install the four corner covers. Each grow container needs to be installed.
Wire grow lights
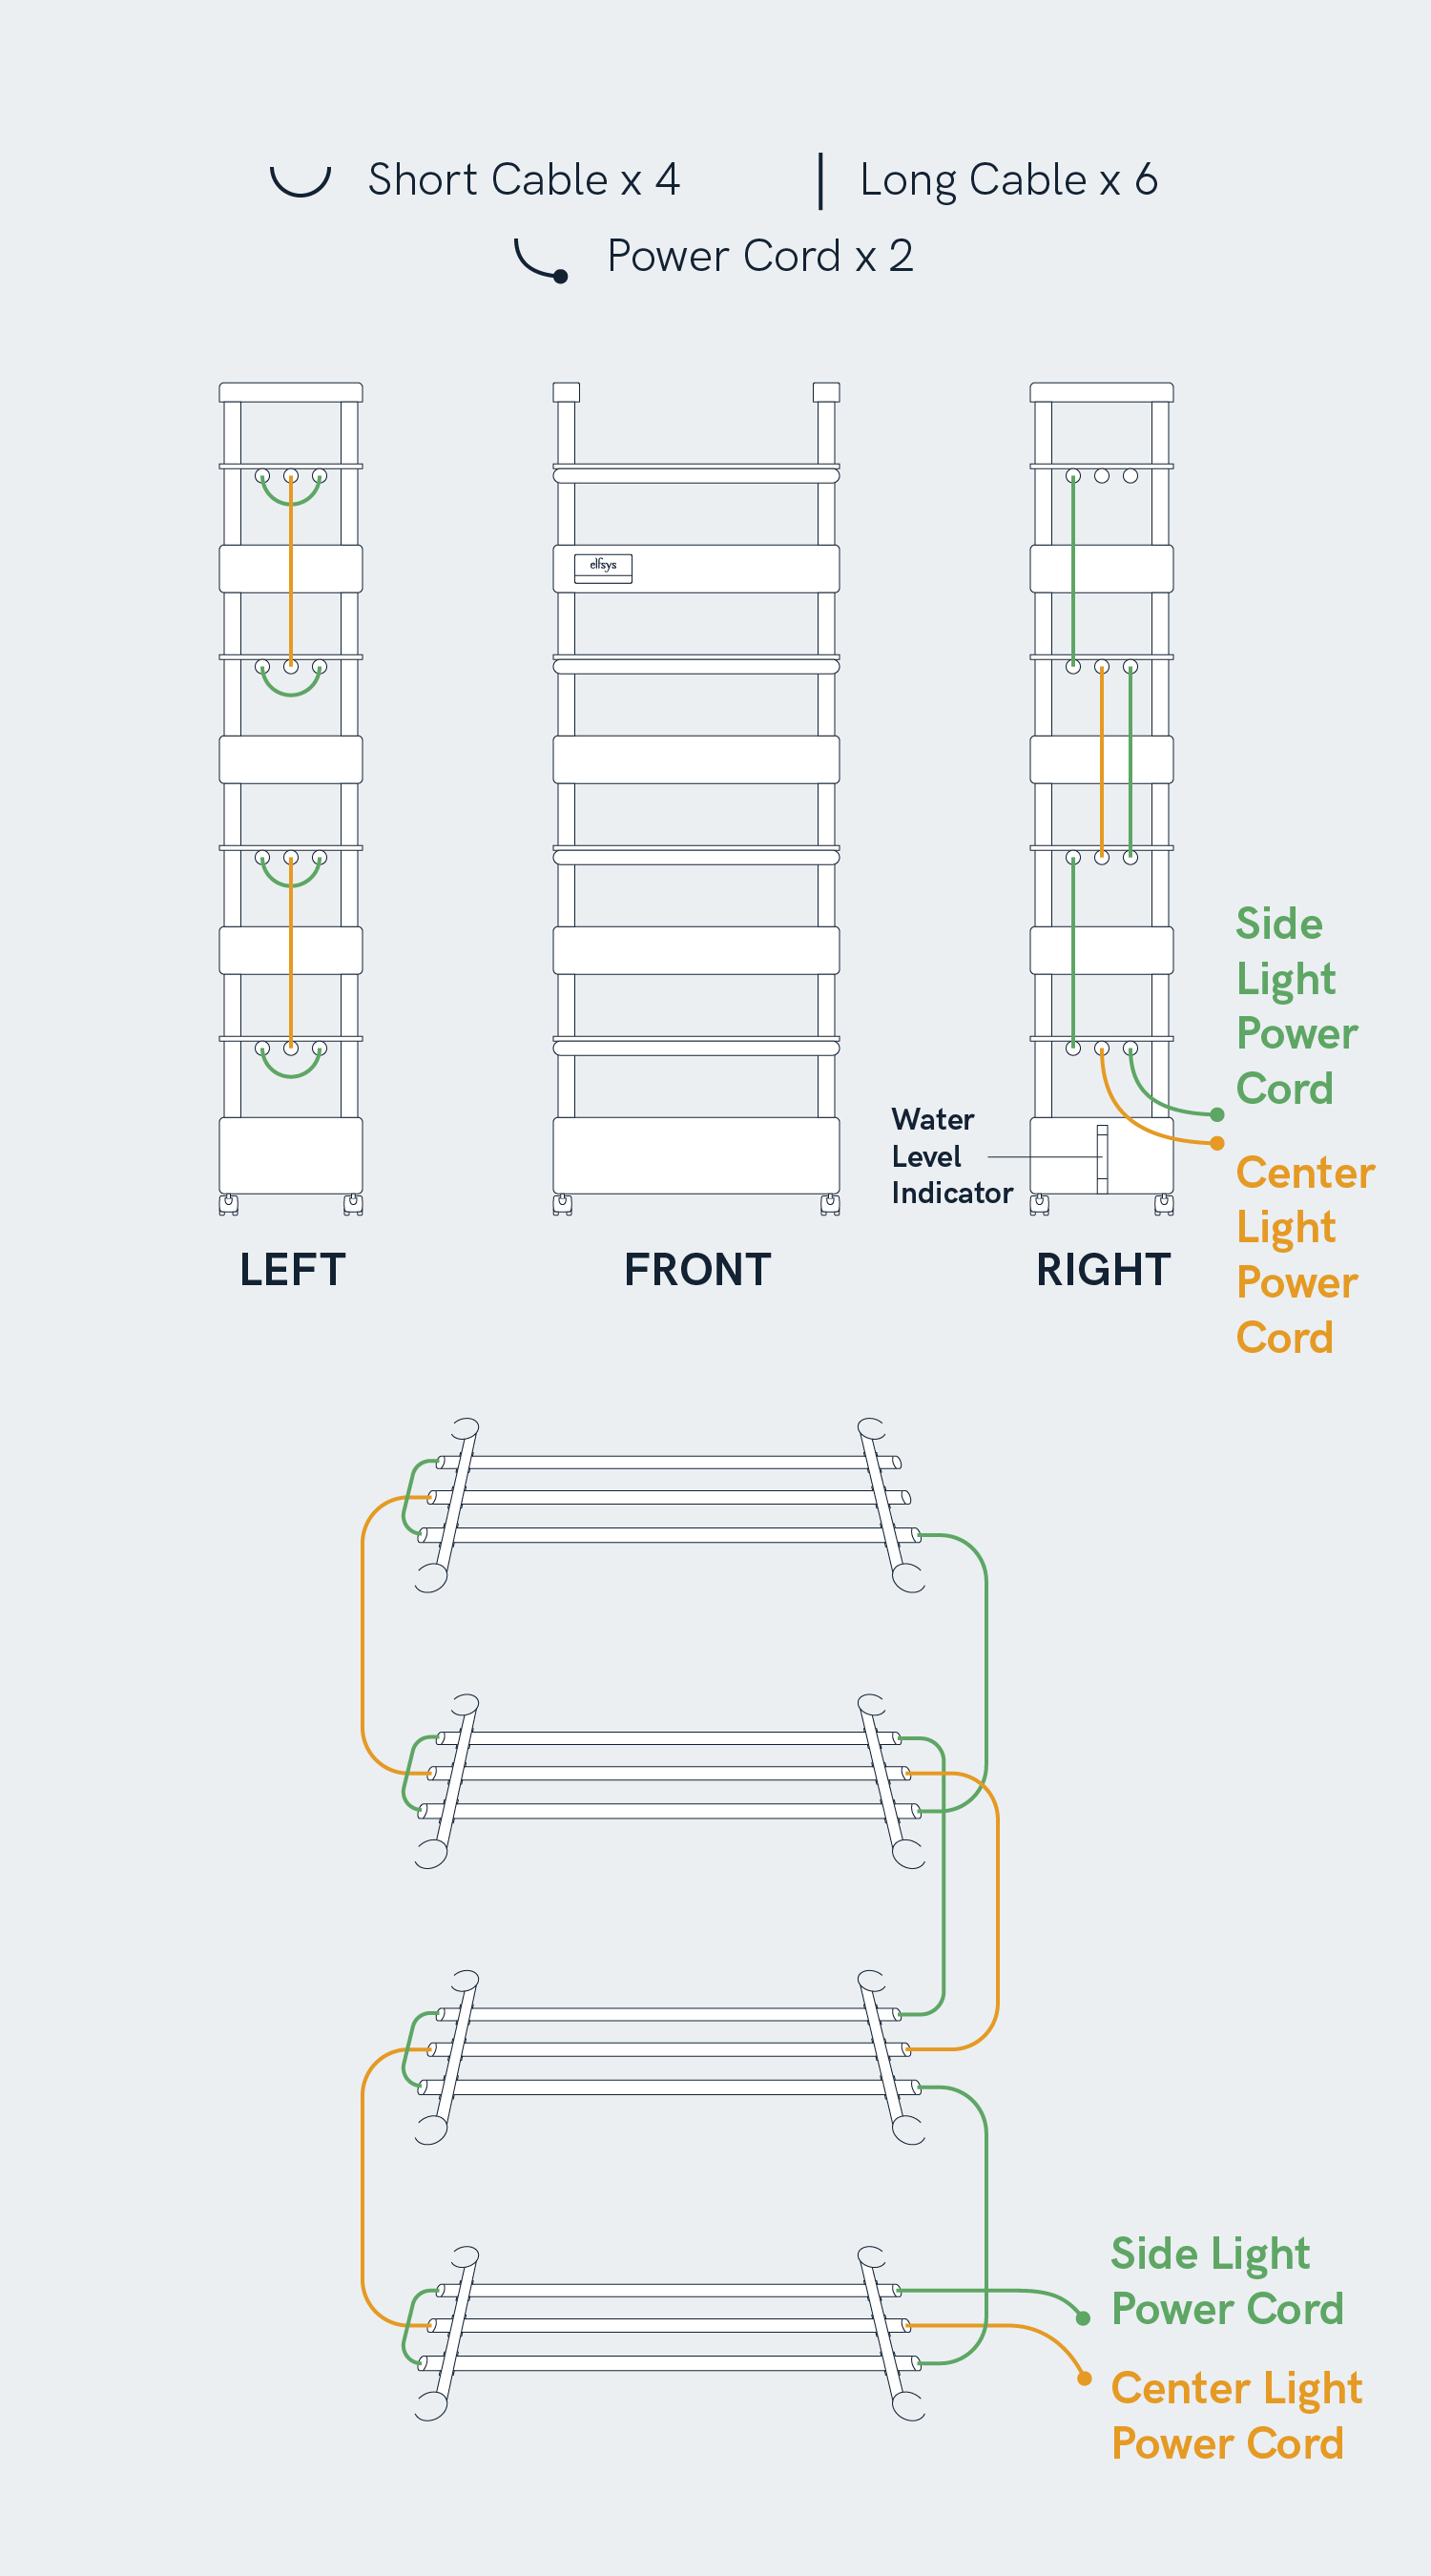
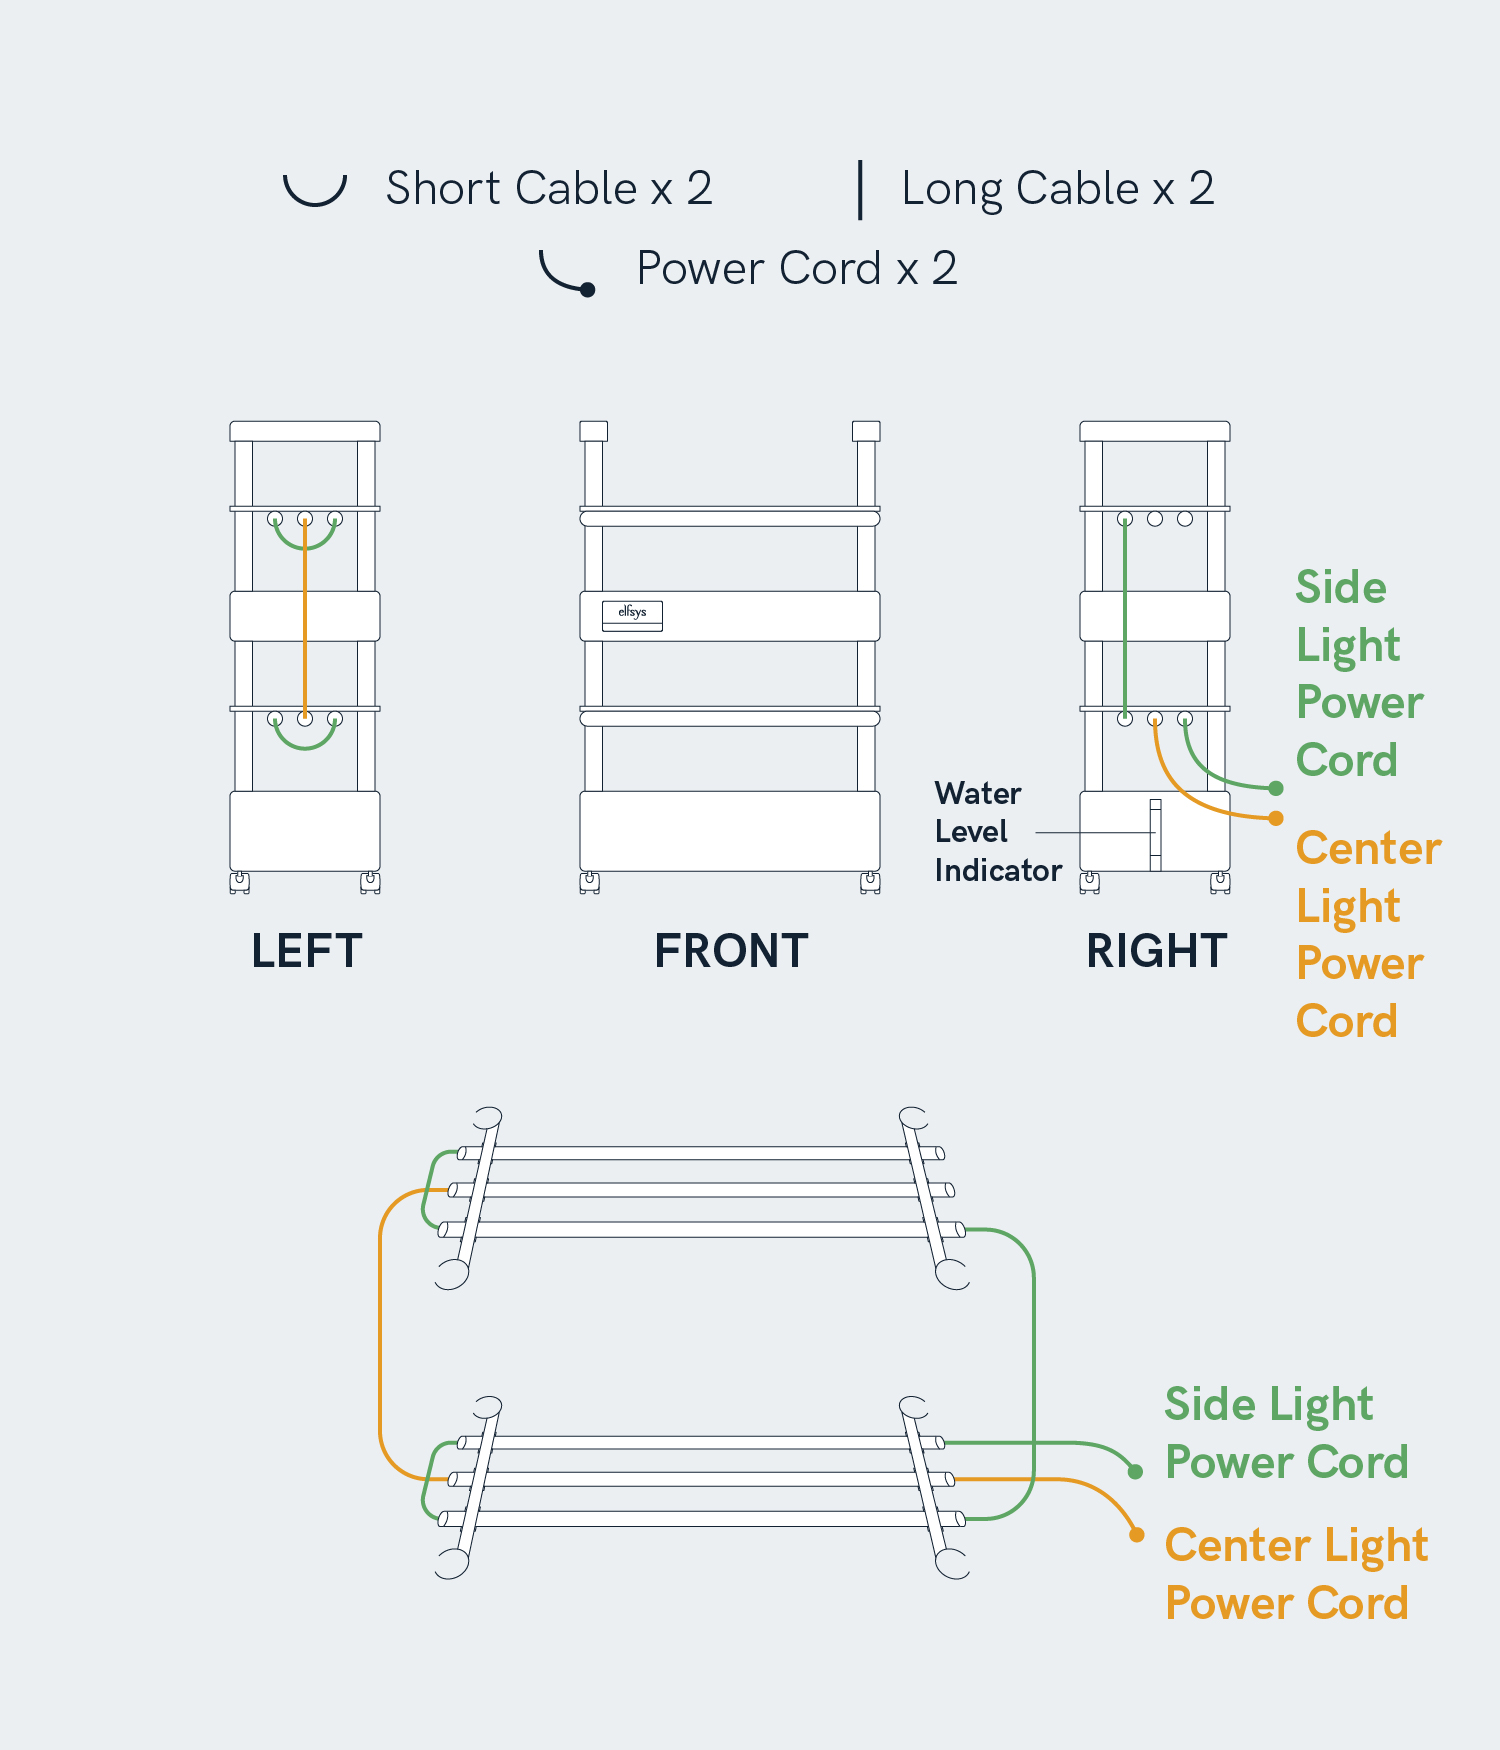
Follow the grow light wiring diagram below to arrange the lights in each tier into two groups, namely the side lights group and the center light group. The side lights should be wired according to the green lines, and the center lights should be wired according to the orange lines. Each group of lights should be connected to an individual power switch cords. This method allows you to independently control them via Elfsys Grow Cloud, and achieve three different light intensity levels.
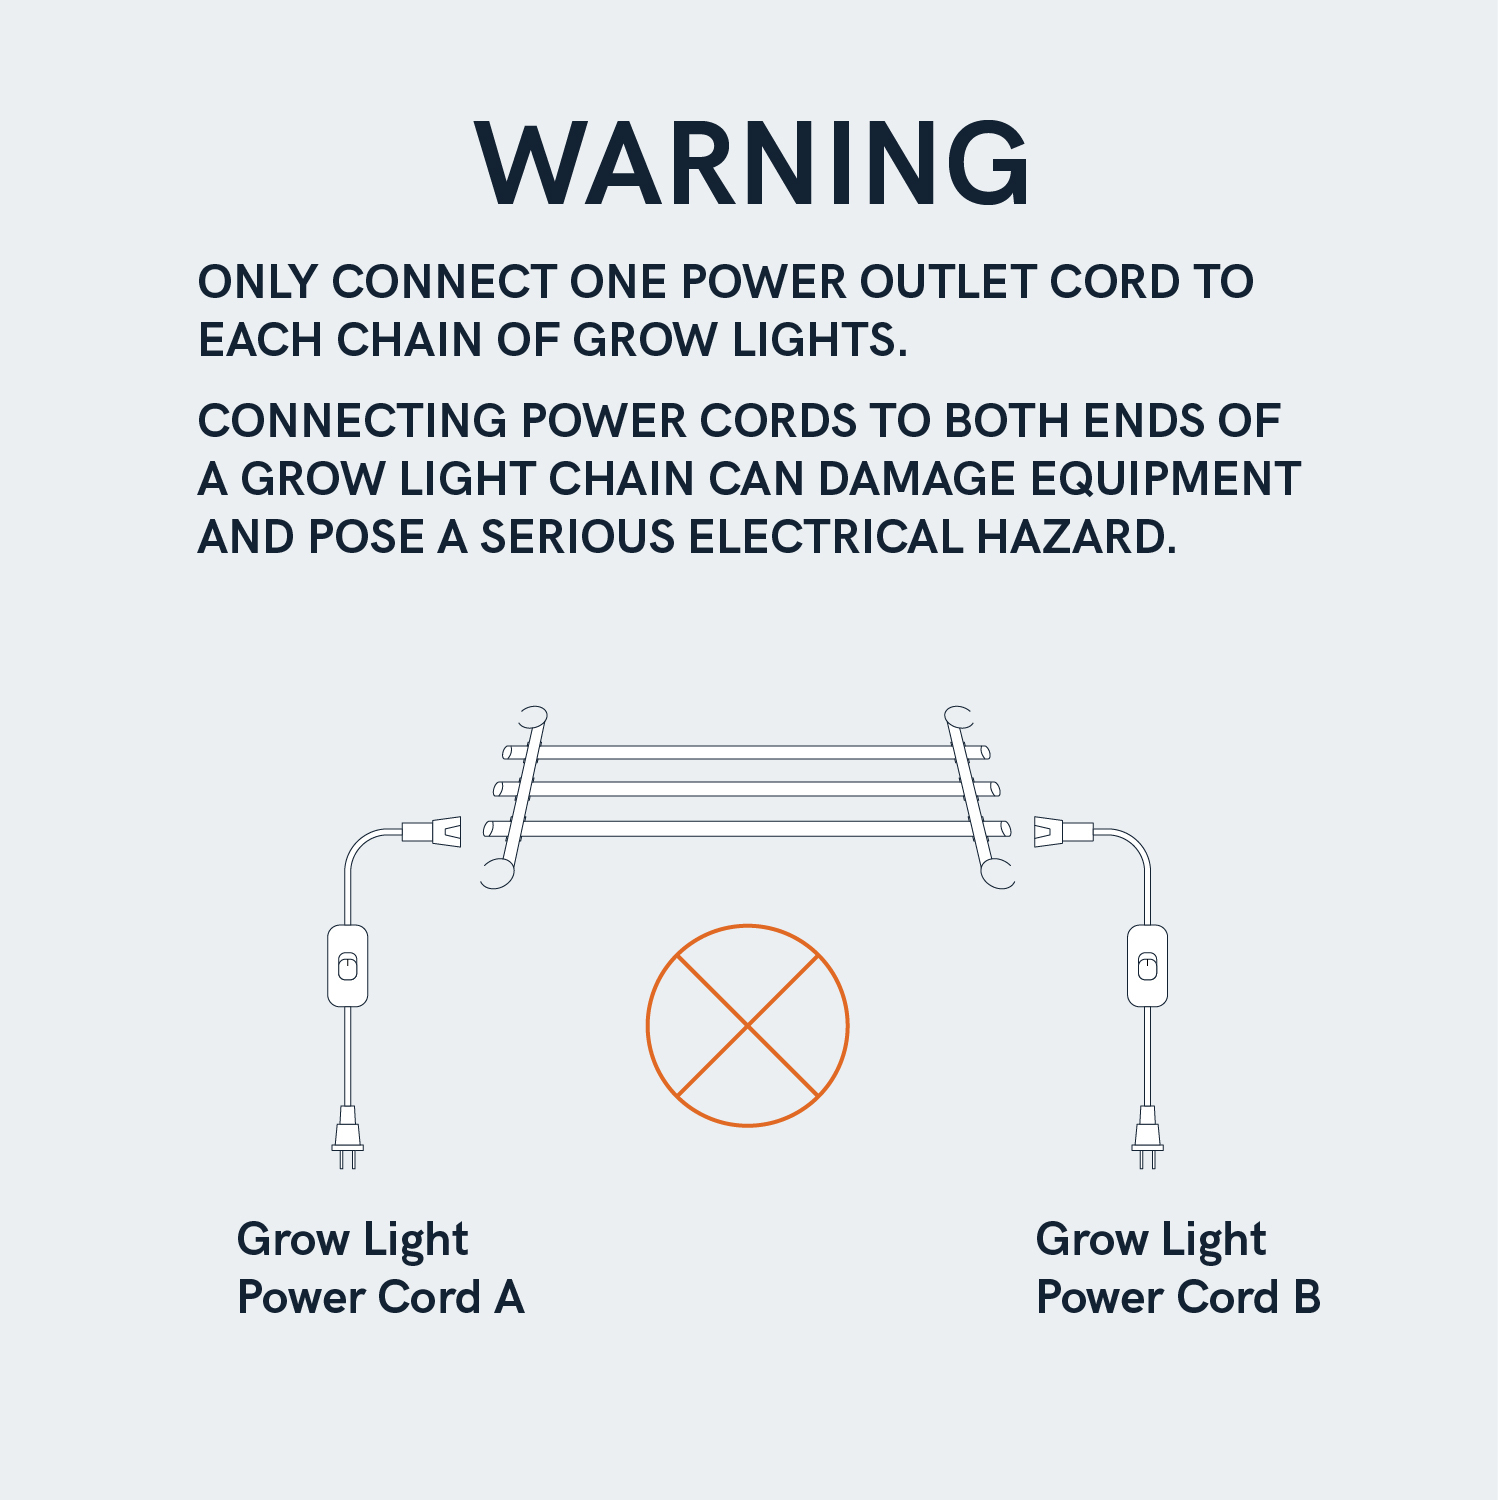
Each chain of the grow lights should only be connected to a power source at one end. Connecting power to both ends at the same time will cause overload and burn out the grow lights, posing a potential risk of an electrical accident.
Check parts
Your package will include 1 primary grow container box and 2 secondary grow container boxes. Before installation, please check the parts according to the photo and item list below.
Primary grow container box

| No. | Name | Quantity | Unit | Note |
|---|---|---|---|---|
| 1 | Primary grow container | 1 | piece | |
| 2 | Water pump power supply | 1 | piece | |
| 3 | Water pump and filter assembly | 1 | set | Pre-installed by default |
| 4 | QR code nameplate | 1 | piece | |
| 5 | Support columns | 4 | piece | |
| 6 | Net pots | 14 | piece | |
| 7 | T5 LED grow lights | 3 | piece | |
| 8 | Elfsys Grow Power Strip | 1 | piece | |
| 9 | Locking caster wheels | 1 | set | 4 per set |
| 10 | Measuring cup | 1 | piece | |
| 11 | Support beams | 2 | piece | |
| 12 | Corner covers | 1 | bag | 4 per bag |
| 13 | Grow light power switch cords | 2 | piece | |
| 14 | Grow light connecting cords - short | 1 | piece | Approximately 12 inches long |
| 15 | Empty hole covers | 1 | bag | 12 per bag |
| 16 | Clay pebbles | 1 | bag | |
| 17 | Grow light mounts | 2 | piece | |
| 18 | Grow container covers | 2 | piece |
A converter is included in the box if your address is located in a region that does not use Type B or I plug standards.
For international orders shipped in December 2024 and onwards, 1 additional T5 LED grow light and 1 grow light mount are also included as spare parts.
Secondary grow container box

| No. | Name | Quantity | Unit | Note |
|---|---|---|---|---|
| 1 | Secondary grow container | 1 | piece | |
| 2 | Support columns | 2 | piece | |
| 3 | Feed column | 1 | piece | With blue protection caps |
| 4 | Drain column | 1 | piece | With brown protection caps |
| 5 | Net pots | 14 | piece | |
| 6 | T5 LED grow lights | 3 | piece | |
| 7 | Empty hole covers | 1 | bag | 12 per bag |
| 8 | Grow light connecting cords - short | 1 | piece | About 12 inches |
| 9 | Grow light connecting cords - long | 2 | piece | About 30 inches |
| 10 | Corner covers | 1 | bag | 4 per bag |
| 11 | Clay pebbles | 1 | bag | |
| 12 | Grow light mounts | 2 | piece | |
| 13 | Grow container covers | 2 | piece |
Assemble the kit
Let's begin assembling the Elfsys Grow Kit. In addition to the text tutorial provided below, you can also view this video.
Assemble primary grow container
The primary grow container is the lowest layer of the Elfsys Grow Kit and also serves as the kit's main nutrient reservoir. Each kit only has one primary grow container.
- Install the four locking caster wheels to the four bottom corners of the primary grow container.
- Connect the water pump power supply. The primary grow container is pre-installed with a water pump and its filter assembly. Turn off the power switch and connect the power supply to the pre-installed water pump. Check if there is a rubber plug in the water inlet corner. If there is, remove it as it won't be used.
The water inlet corner is the closest to the water pump, which has a soft tube connected to the water pump.
- Keep the remaining parts aside, the support columns and beams are installed to the top layer of the kit. You do not need to install grow lights, support columns and net pots now.
Assemble secondary grow container
The secondary grow container is an expansion module that can be added on top of the primary grow container. Each grow kit can add up to 3 secondary grow containers. Each secondary grow container can add 14 net pots, 45W of artificial light output, and 1.85 gallons (7 liters) of nutrient solution.
- Install the feed column. Identify the feed column with blue protective caps. The feed column has two rubber seals at both ends and one internal water feed tube. When installing onto the primary grow container below, first insert the feed tube inside the feed port of the primary grow container into the small hole of the seal at either end of the feed column, then insert the feed column into the primary grow container. When installing onto another secondary grow container below, directly insert the feed column into the feed slot of the secondary grow container. You can twist and tap the feed column to ensure it is fully inserted.
Actual photo of the feed slots

The feed slot of the primary grow container. It contains a plastic water feed tube connected to the water pump.

The feed slot of the secondary grow container.
- Install the drain column. Identify the drain column with brown protective caps. Be sure to distinguish it from the feed column. The drain column must be inserted in the drain slot of the grow container.
Actual photo of the drain slot

- Install the support columns. Insert the remaining two columns into the remaining two slots of the grow container at below. Twist and tap the columns to ensure they are fully inserted.
- Install the secondary grow container. Align the feed slot at the bottom of the grow container with the feed column, the darin slot with the drain column, and the other two corners with support columns. After alignment, press down hard on the secondary grow container, then tap the four corners to ensure all columns are fully inserted on both ends.
Actual photo of slots at the bottom of the grow container

The feed slot at the bottom of the secondary grow container.

The drain slot at the bottom of the secondary grow container.
- Repeat the above steps to install the remaining secondary grow containers.
- Take out the four support columns and the two support beams from the primary grow container box. Install the support columns at the four corners of the topmost secondary grow container. Group two columns on the short side and install the support beams on them.
Install grow lights
With the grow light mount column slots opening facing outwards, insert one end of the each grow lights into each light slots, then clip on another grow light mount in the same manner on the opposite side. Then, tilt the entire light assembly and place it in between the grow container columns. First, from one side, press the grow light mount until it snaps onto the two columns, then adjust the height of the opposite side and snap onto the other two columns.
Install grow container covers and corner covers
Install the grow container covers. Align the slots on the grow container covers to the side walls of the grow container, then install the four corner covers. Each grow container needs to be installed.
Wire grow lights
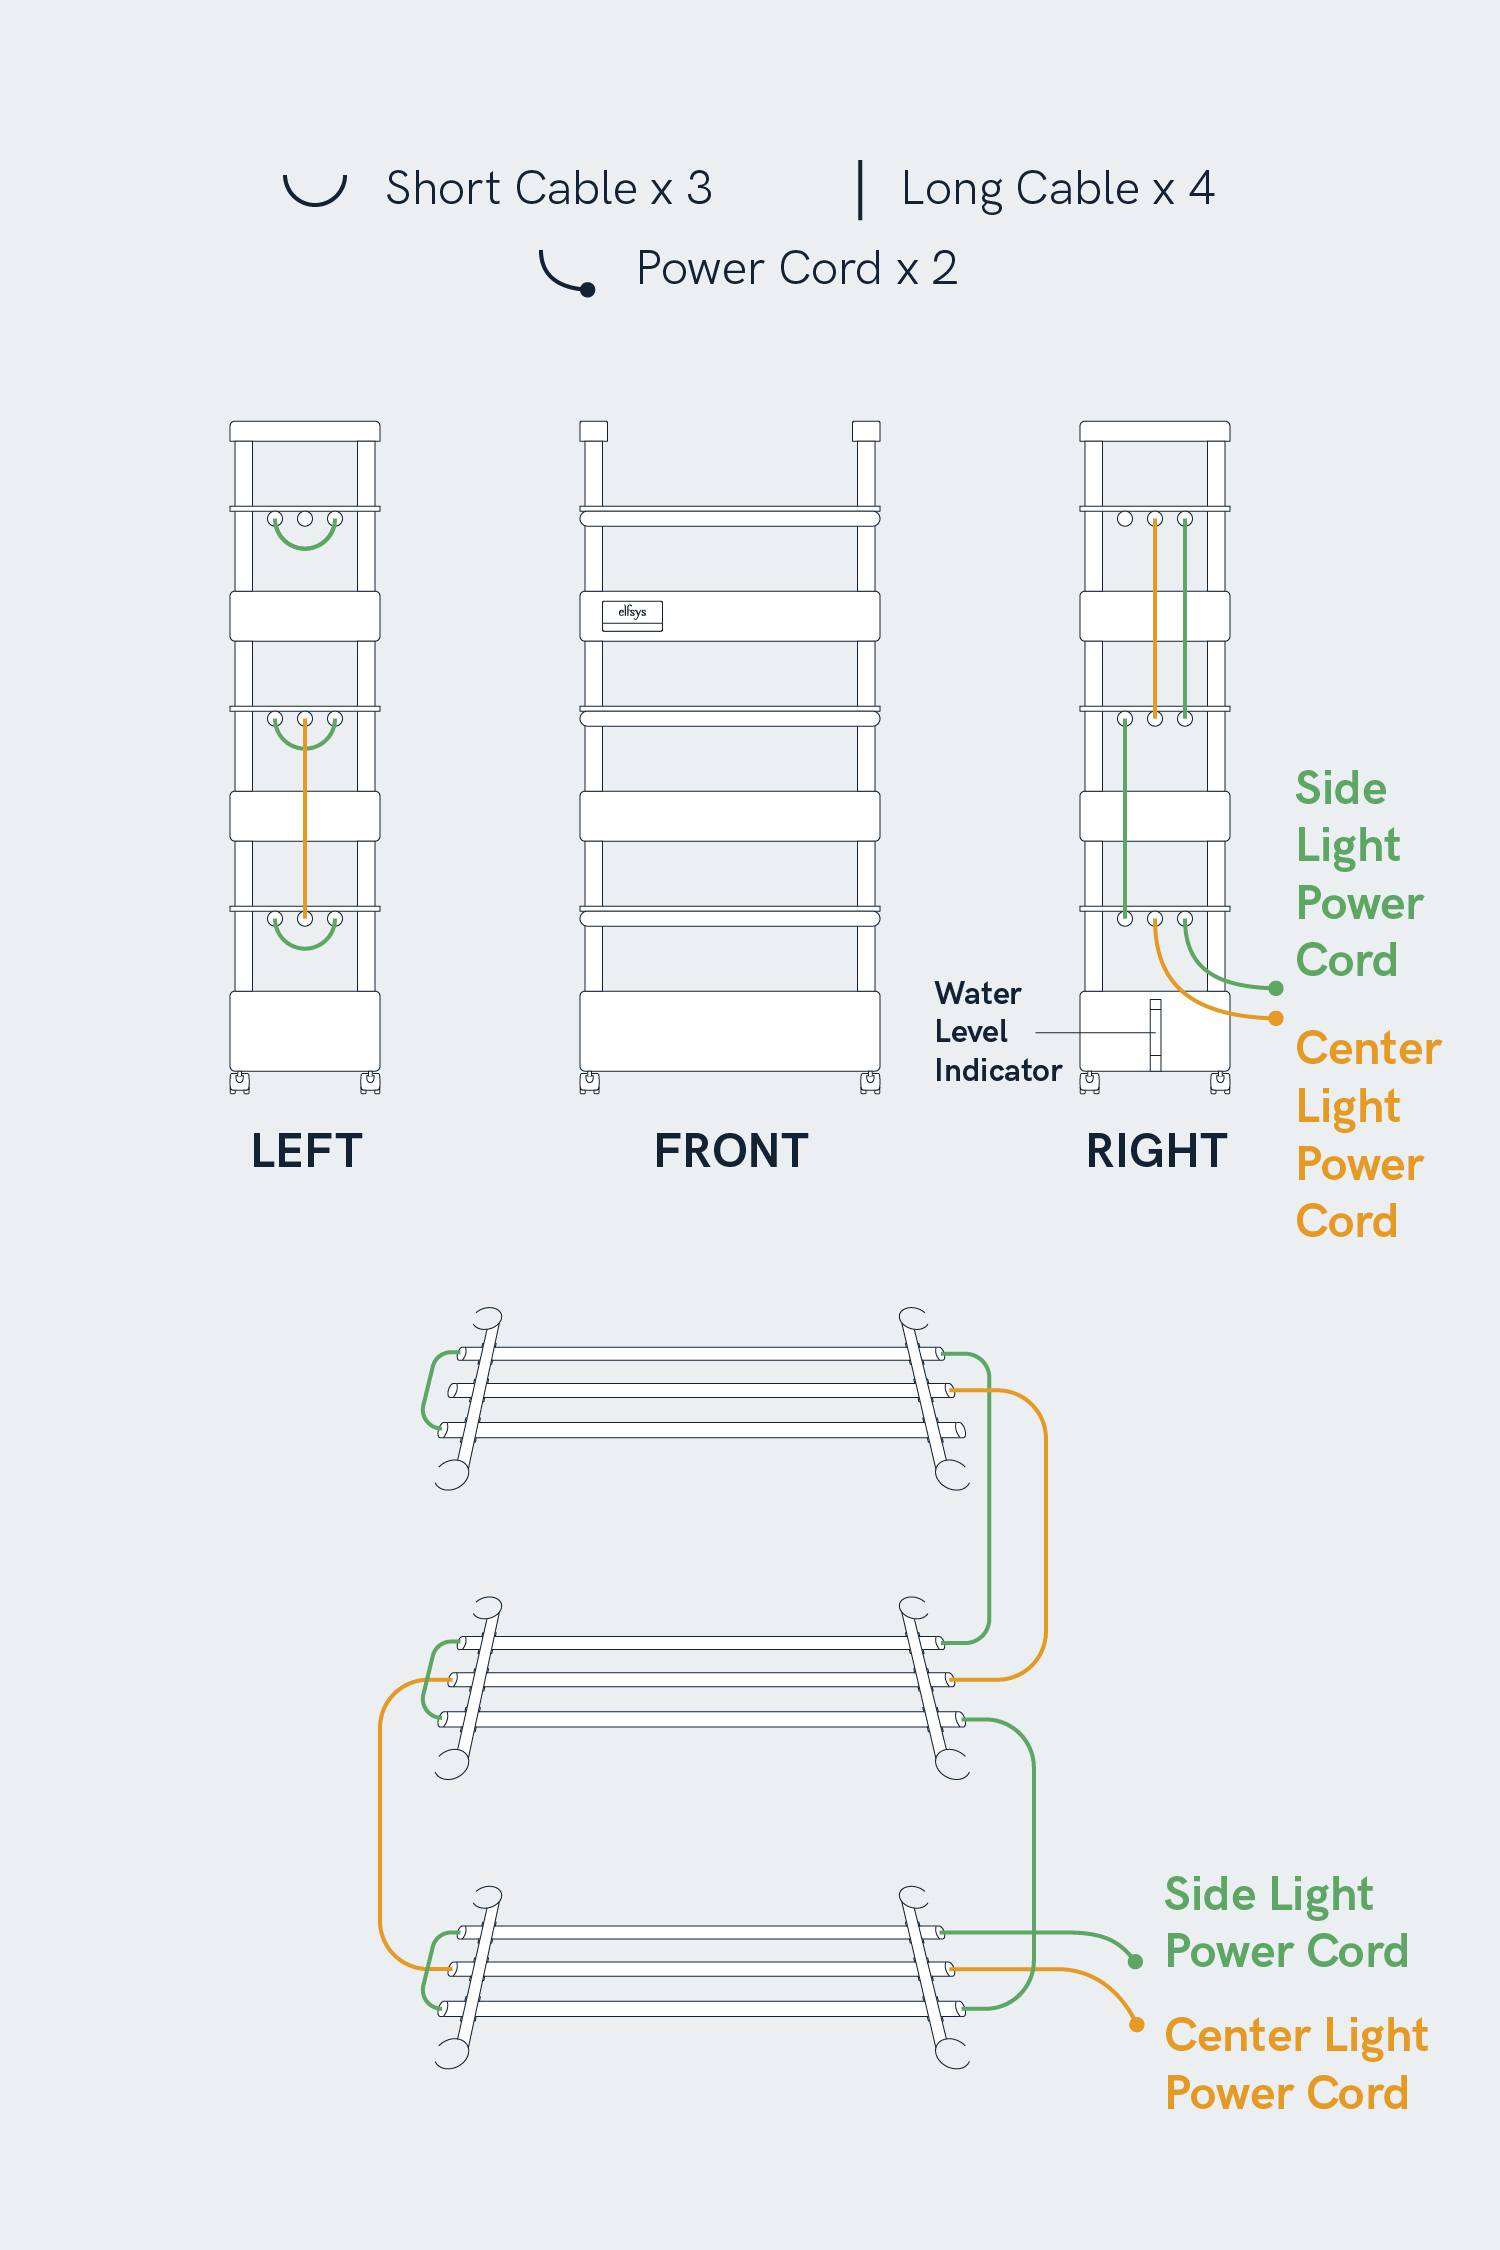
Follow the grow light wiring diagram below to arrange the lights in each tier into two groups, namely the side lights group and the center light group. The side lights should be wired according to the green lines, and the center lights should be wired according to the orange lines. Each group of lights should be connected to an individual power switch cords. This method allows you to independently control them via Elfsys Grow Cloud, and achieve three different light intensity levels.
Each chain of the grow lights should only be connected to a power source at one end. Connecting power to both ends at the same time will cause overload and burn out the grow lights, posing a potential risk of an electrical accident.

Check parts
Your package will include 1 primary grow container box and 3 secondary grow container boxes. Before installation, please check the parts according to the photo and item list below.
Primary grow container box

| No. | Name | Quantity | Unit | Note |
|---|---|---|---|---|
| 1 | Primary grow container | 1 | piece | |
| 2 | Water pump power supply | 1 | piece | |
| 3 | Water pump and filter assembly | 1 | set | Pre-installed by default |
| 4 | QR code nameplate | 1 | piece | |
| 5 | Support columns | 4 | piece | |
| 6 | Net pots | 14 | piece | |
| 7 | T5 LED grow lights | 3 | piece | |
| 8 | Elfsys Grow Power Strip | 1 | piece | |
| 9 | Locking caster wheels | 1 | set | 4 per set |
| 10 | Measuring cup | 1 | piece | |
| 11 | Support beams | 2 | piece | |
| 12 | Corner covers | 1 | bag | 4 per bag |
| 13 | Grow light power switch cords | 2 | piece | |
| 14 | Grow light connecting cords - short | 1 | piece | Approximately 12 inches long |
| 15 | Empty hole covers | 1 | bag | 12 per bag |
| 16 | Clay pebbles | 1 | bag | |
| 17 | Grow light mounts | 2 | piece | |
| 18 | Grow container covers | 2 | piece |
A converter is included in the box if your address is located in a region that does not use Type B or I plug standards.
For international orders shipped in December 2024 and onwards, 1 additional T5 LED grow light and 1 grow light mount are also included as spare parts.
Secondary grow container box

| No. | Name | Quantity | Unit | Note |
|---|---|---|---|---|
| 1 | Secondary grow container | 1 | piece | |
| 2 | Support columns | 2 | piece | |
| 3 | Feed column | 1 | piece | With blue protection caps |
| 4 | Drain column | 1 | piece | With brown protection caps |
| 5 | Net pots | 14 | piece | |
| 6 | T5 LED grow lights | 3 | piece | |
| 7 | Empty hole covers | 1 | bag | 12 per bag |
| 8 | Grow light connecting cords - short | 1 | piece | About 12 inches |
| 9 | Grow light connecting cords - long | 2 | piece | About 30 inches |
| 10 | Corner covers | 1 | bag | 4 per bag |
| 11 | Clay pebbles | 1 | bag | |
| 12 | Grow light mounts | 2 | piece | |
| 13 | Grow container covers | 2 | piece |
Assemble the kit
Let's begin assembling the Elfsys Grow Kit. In addition to the text tutorial provided below, you can also view this video.
Assemble primary grow container
The primary grow container is the lowest layer of the Elfsys Grow Kit and also serves as the kit's main nutrient reservoir. Each kit only has one primary grow container.
- Install the four locking caster wheels to the four bottom corners of the primary grow container.
- Connect the water pump power supply. The primary grow container is pre-installed with a water pump and its filter assembly. Turn off the power switch and connect the power supply to the pre-installed water pump. Check if there is a rubber plug in the water inlet corner. If there is, remove it as it won't be used.
The water inlet corner is the closest to the water pump, which has a soft tube connected to the water pump.
- Keep the remaining parts aside, the support columns and beams are installed to the top layer of the kit. You do not need to install grow lights, support columns and net pots now.
Assemble secondary grow container
The secondary grow container is an expansion module that can be added on top of the primary grow container. Each grow kit can add up to 3 secondary grow containers. Each secondary grow container can add 14 net pots, 45W of artificial light output, and 1.85 gallons (7 liters) of nutrient solution.
- Install the feed column. Identify the feed column with blue protective caps. The feed column has two rubber seals at both ends and one internal water feed tube. When installing onto the primary grow container below, first insert the feed tube inside the feed port of the primary grow container into the small hole of the seal at either end of the feed column, then insert the feed column into the primary grow container. When installing onto another secondary grow container below, directly insert the feed column into the feed slot of the secondary grow container. You can twist and tap the feed column to ensure it is fully inserted.
Actual photo of the feed slots

The feed slot of the primary grow container. It contains a plastic water feed tube connected to the water pump.

The feed slot of the secondary grow container.
- Install the drain column. Identify the drain column with brown protective caps. Be sure to distinguish it from the feed column. The drain column must be inserted in the drain slot of the grow container.
Actual photo of the drain slot

- Install the support columns. Insert the remaining two columns into the remaining two slots of the grow container at below. Twist and tap the columns to ensure they are fully inserted.
- Install the secondary grow container. Align the feed slot at the bottom of the grow container with the feed column, the darin slot with the drain column, and the other two corners with support columns. After alignment, press down hard on the secondary grow container, then tap the four corners to ensure all columns are fully inserted on both ends.
Actual photo of slots at the bottom of the grow container

The feed slot at the bottom of the secondary grow container.

The drain slot at the bottom of the secondary grow container.
- Repeat the above steps to install the remaining secondary grow containers.
- Take out the four support columns and the two support beams from the primary grow container box. Install the support columns at the four corners of the topmost secondary grow container. Group two columns on the short side and install the support beams on them.
Install grow lights
With the grow light mount column slots opening facing outwards, insert one end of the each grow lights into each light slots, then clip on another grow light mount in the same manner on the opposite side. Then, tilt the entire light assembly and place it in between the grow container columns. First, from one side, press the grow light mount until it snaps onto the two columns, then adjust the height of the opposite side and snap onto the other two columns.
Install grow container covers and corner covers
Install the grow container covers. Align the slots on the grow container covers to the side walls of the grow container, then install the four corner covers. Each grow container needs to be installed.
Wire grow lights
Follow the grow light wiring diagram below to arrange the lights in each tier into two groups, namely the side lights group and the center light group. The side lights should be wired according to the green lines, and the center lights should be wired according to the orange lines. Each group of lights should be connected to an individual power switch cords. This method allows you to independently control them via Elfsys Grow Cloud, and achieve three different light intensity levels.
Each chain of the grow lights should only be connected to a power source at one end. Connecting power to both ends at the same time will cause overload and burn out the grow lights, posing a potential risk of an electrical accident.

